This project really pushes the limits of what you can do with audio sampling on an Arduino! It is almost the same as the 3-Track Looper project so I recommend you read that first. Now instead of controlling a loop delay with a potentiometer, we can lay down a track by tapping out a rhythm that plays a sample. This project really works best if you use very short samples like drum sounds or words you say with your voice. Just as before, the tracks can be played back and mixed together.
Load the Audio Hacker example sketch File->Examples->Audio Hacker->DrumMachine. For this project, I used the DJ Shield because it provides all the buttons.
You can build it on a breadboard if you want:
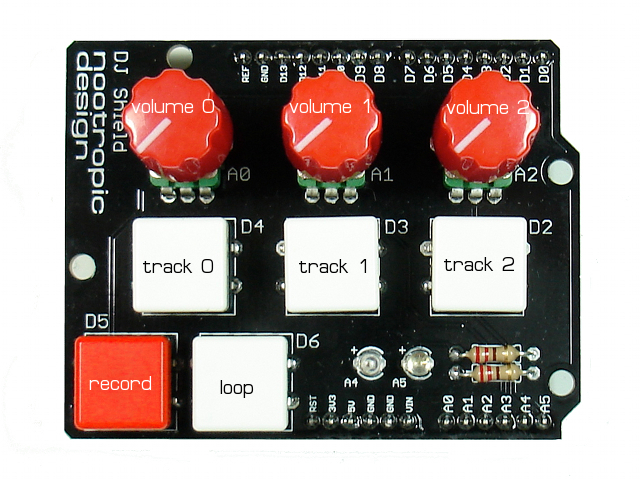
Record button = D5
Loop button = D6
Track 0 button = D4
Track 1 button = D3
Track 2 button = D2
Track 0 volume = A0
Track 1 volume = A1
Track 2 volume = A2
When the record button is tapped (pressed and released), it toggles the “passthrough” mode for the input. That is, when the sketch starts, the input is passed through to the output so you can hear it, but you can enable/disable the passthrough by tapping the record button.
To record a track, first enable the audio passthrough so you can hear the audio signal. Now press and hold the record button down, then hold down a track button to record the track. Release the track button when done recording, or if you exhaust the memory size for that track, the output will stop. To play the track (just once), press the track button. Like I said before, this project works best with very short samples.
Before you set up any looping, record more sounds onto the other track buttons using this same technique. You can play your samples by simply pressing the track buttons.
Now it’s time to create some loops. To lay down a looping track using the sampled audio, first press and hold the loop button. Now tap out a rhythm on a track button. When you want your tapped rhythm to start repeating, release the loop button. Now while this track is looping, hold the loop button and tap out another rhythm on another track. Release the loop button to start that rhythm looping. The two loops will be mixed together, each playing the rhythm you tapped out. To stop the looping of a track, tap the track button. You can control the playback volume of each track with the potentiometer above the track button. This is an example of controlling volume digitally by changing the level of the output signal in code. It’s crude but needs to be fast.
If the controls are confusing, just play with it for a while until you get the hang of it. You can enable debugging by uncommenting the line #define DEBUG and open the Arduino serial monitor with speed 115200. This will show you information about what is going on in the sketch.
Performance Notes
This sketch is rather complicated so there are some performance compromises. The sample rate is 16 kHz and the samples are 8-bit audio.
The memory is divided up as follows: track 0 is on the first SRAM chip (128K) and can hold about 6 seconds. Tracks 1 and 2 split the second SRAM chip and are about 3 seconds each.
