
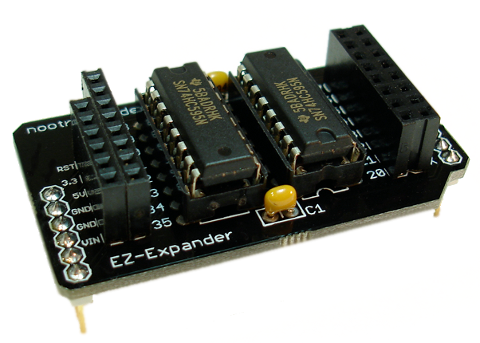
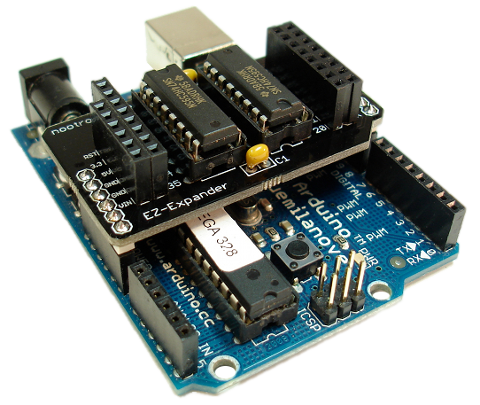
The EZ-Expander is an Arduino shield that makes it easy and inexpensive to add digital output pins to your Arduino. This is accomplished by utilizing two 74HC595 shift registers. There are 16 new output pins on the shield (numbered 20-35), and the shield itself uses 3 existing Arduino pins to operate (pins 8, 12, and 13), so overall you get 13 additional output pins to use. I’ve provided an open source software library that makes it extremely easy to access the new pins 20-35 without having to worry about controlling the shift registers in your Arduino sketch.
The new digital pins 20-35 can only be used for output, not input. They cannot source or sink as much current as normal Arduino pins. An Arduino pin can source/sink 40mA, but the outputs the EZ-Expander shield can only source/sink 6mA (ok, I’ve done more without damage). This is still enough to light an LED with an appropriately sized resistor to limit the current (e.g. 470 ohms), and, of course, you can use transistors to drive higher loads. See the 74HC595 datasheet for specifications.
All other Arduino pins are brought up to the top of the shield for easy access. Since pins 8 (latch), 12 (clock), and 13 (data) are used by the shield, they are not available for use and are marked with an ‘X’ on the silkscreen. I chose pins 8, 12, and 13 to control the shield because I didn’t want to use up any PWM-capable pins (9, 10, 11).
Software Library
Writing Arduino code to control shift registers is not too difficult (see this tutorial), but I’ve provided an open source software library to make it very easy to access the pins on the EZ-Expander shield. Using the library to control the pins is very simple. Here’s an example that sets all the outputs to HIGH, delays for one second, sets all the outputs to LOW, delays one second then repeats.
#include <EZExpander.h>

// Create an EZExpander object
EZExpander expander = EZExpander();

void setup() {
}

void loop() {
  for(int i=20;i<=35;i++) {
    expander.digitalWrite(i, HIGH);
  }
  delay(1000);
  for(int i=20;i<=35;i++) {
    expander.digitalWrite(i, LOW);
  }
  delay(1000);
}
In summary,
- You must include the EZExpander.h header file.
- Use the EZExpander method digitalWrite(pin, value) to set values on output pins 20-35. This is not the ordinary Arduino digitalWrite function call; it is a method of the EZExpander class.
- It is not necessary to use pinMode(pin, OUTPUT) on the EZ-Expander pins. They are used for output only.
Download and Install
Download the EZ-Expander library and unzip it in your Arduino sketchbook libraries directory. If the libraries directory doesn’t exist you will need to create it. There is a simple example called EZExpanderExample which will now show up in the Arduino application’s File->Examples->EZExpander menu.
Advanced API Usage
Using the library with your own shift registers
It is possible to use the EZ-Expander library with your own shift register circuitry (without a EZ-Expander shield). You just need to know the default pins used by the library:
- pin 8: latch
- pin 12: clock
- pin 13: data
If you want to wire up your shift registers using different pins, you can use the constructor that takes the pins as arguments:
EZExpander(int latchPin, int clockPin, int dataPin)
Performance Enhancements
When you use the digitalWrite(int pin, int value) method, the EZ-Expander library shifts all current values out to the shift register chips immediately. If your application needs to set the values of many of the 16 pins at the same time, you have the option to defer the actual Arduino shiftOut operation until after you have set all the values. This may be desirable for performance-sensitive applications. In practice, I have found that the shiftOut operation is very fast, but wanted to provide the option to defer the shiftOutoperation until needed. Simply pass a third boolean argument to your digitalWrite call with the value false. This tells the library to not perform the actual shiftOut operation. Then when you are done setting values, call doShiftOut() method to write all the values out to the chips. Here’s an example:
#include <EZExpander.h>

// Create a EZExpander object
EZExpander expander = EZExpander();

void setup() {
}

void loop() {
  // set the values
  for(int i=20;i<=35;i++) {
    expander.digitalWrite(i, HIGH, false);
  }
  // then perform the shift out to the chips
  expander.doShiftOut();
}