Project source code at GitHub: iot-wifi-outlet
They say necessity is the mother of invention, and there’s no question that the need to turn on my coffee maker while still in bed is a necessity. I don’t want to wait for my coffee to brew after I go down to the kitchen in the morning. I want my coffee ready as soon as I get there. It’s not that I’m impatient, I just have lots of electronics work to do, right?
Obviously, I needed a solution that would allow me to start my coffee brewing from my phone which I keep at my bedside. This is a great example of a problem in need of an IoT (Internet of Things) solution. The coffee maker is a thing I want to control from the Internet.
I’m the only one in my house that drinks coffee, so I have a simple single-serving coffee maker that I like to set up the night before. To brew, there is a mechanical button on the side that turns on the heating element and then “pops out” after the brewing process. If there is no power supplied to the coffee maker, this button can still be pressed in, and when power is supplied, the brewing will start. All I needed is a way to turn on the AC mains power to the coffee maker.
Building an Wi-Fi Enabled Electrical Outlet
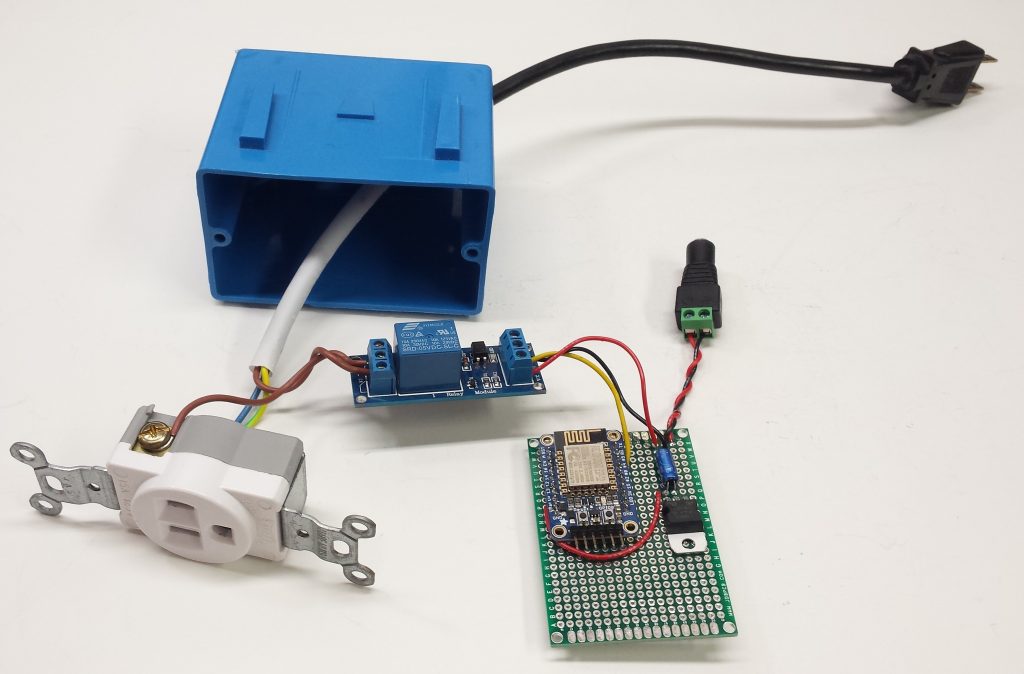
IoT enabled electrical outlet
Enabling an electrical outlet to connect to a Wi-Fi is not difficult. I used an ESP8266 wi-fi microcontroller to control a relay that switches the mains power on and off. I used an Adafruit Huzzah board which is just a convenient breakout board for the ESP8266. The relay control wire is connected to an ESP8266 GPIO pin and a simple Arduino program running on the ESP8266 makes it easy to control the relay. There are several ways to program an ESP8266, but I prefer to use Arduino. See this guide for instructions on how to get started programming the ESP8266 with the Arduino IDE.
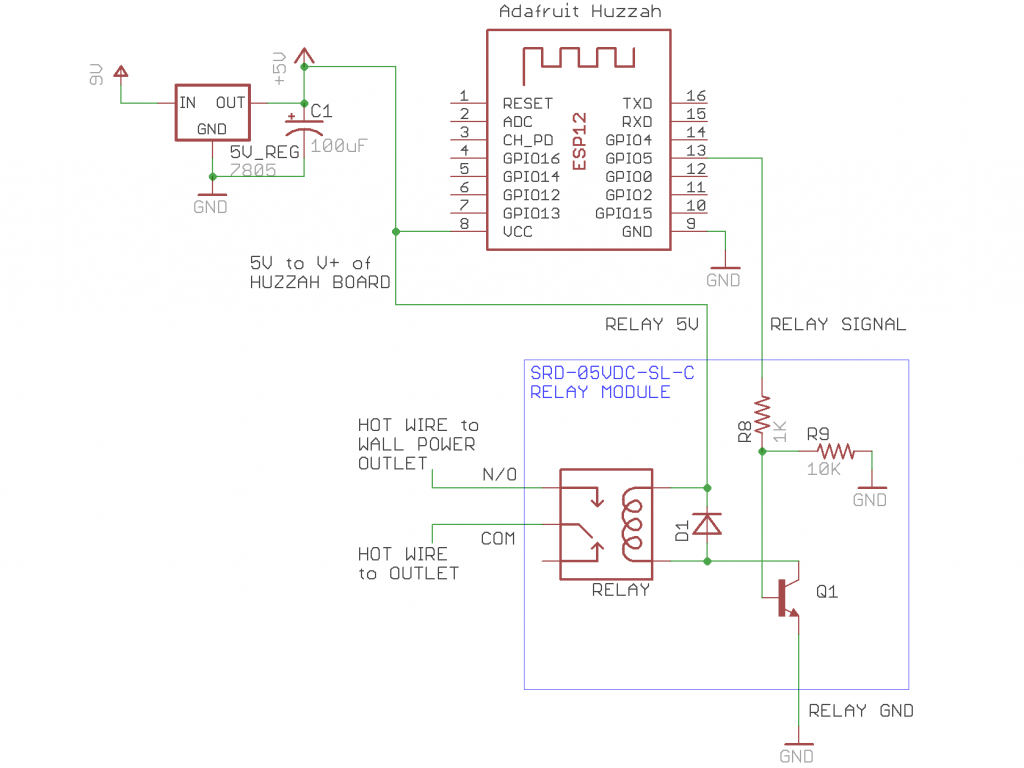
Here is the schematic for the circuit. I power the circuit with a common 9V adapter. A voltage regulator provides 5V to the relay coil and to the Huzzah board (which has an onboard 3.3V regulator to power the ESP8266). Note that the GPIO pins are 3.3V, but I found no problems controlling the 5V relay with 3.3V logic.
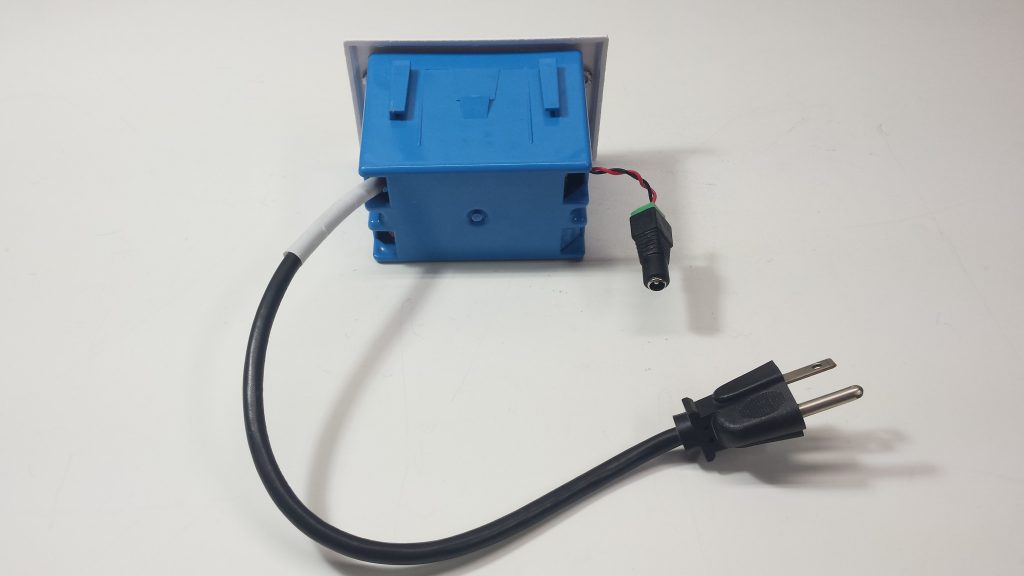
An ordinary wall plug connects this IoT outlet box to normal outlet in the wall, and the wires are connected to the outlet enclosed in the box. The relay connects and disconnects the “line” or “hot” wire of the mains circuit. That is, the relay is between the wall power and the outlet provided by this outlet box. Here’s how it looks all closed up.
Controlling the Outlet from the Internet with MQTT
Now that we have a way for Arduino code to turn the power on and off, how do we connect it to the Internet and control it? Step one is to get connected to your Wi-Fi network. This is very easy, and to keep things simple, the source code for this project just has you hard code your SSID and password. But we still need a way to send a command to the outlet. I’m using MQTT for this purpose, which is implemented by the Arduino PubSubClient library. MQTT allows the outlet to subscribe to an MQTT topic on an MQTT broker. An MQTT broker allows different MQTT clients to publish messages to topics and/or subscribe to topics. I run my own MQTT broker for all my MQTT projects, but you can set up a free account on CloudMQTT. Their free plan allows you to have up to 10 connections. The source code for this project makes it clear where to set the information for your account: username, password, server, and port. This project uses an SSL connection, so use the SSL port on your CloudMQTT server.
The outlet subscribes to a topic called “coffee-maker” and my phone will publish messages to that topic. If the outlet receives a message “ON” on this topic, it will turn the relay on. If it receives an “OFF” message, the relay is switched off. You can also specify a delay so that the outlet is switched off after a period of time. My coffee will be done brewing within 10 minutes, so I want everything switched off. To do this, I send the message “ON”, but also with the number of seconds for the auto-off delay. For 10 minutes, I send “ON:600”.
Remote Control on the Phone
I have an Android phone and use a simple app called MQTT Dash. It lets you create dashboards with controls on them. My coffee maker dashboard has a button that can toggle between on and off for the outlet. It’s green when the outlet is turned on and publishes the message “ON:600” to the topic coffee-maker, and is red when I publish “OFF” to to the same topic. Here is the setup for the control:
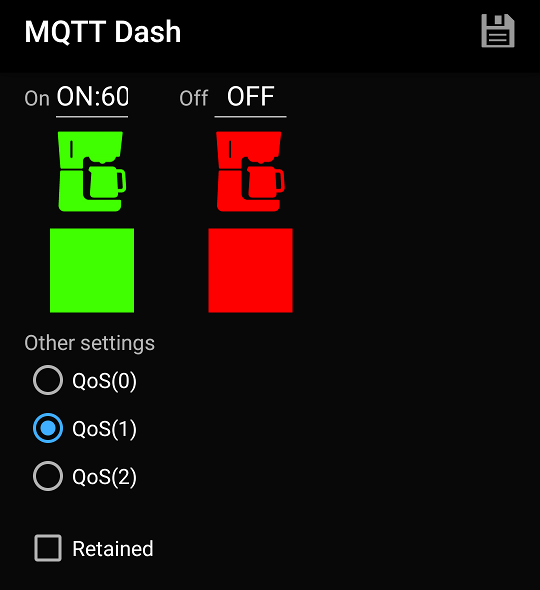
MQTT Dash has many icons to choose from when creating a button — even a coffee maker icon! This gives me a great little dashboard for my coffee maker. Just tap to turn it on/off!

Project source code at GitHub: iot-wifi-outlet
