I have been playing with LoRa modules a lot recently (see projects LoRa Weather Station and LoRa Mesh Networking) and even designed my own LoRa development boards. LoRa is an easy way to achieve low-power, long range radio communication with small payloads. To get even more capability out of this radio technology, you can set up a LoRaWAN network that is connected to the Internet and allows mobile nodes to hop between gateways, just like your mobile phone connects to different cell towers as you move around. So this summer I was determined to set up a low-cost LoRaWAN gateway and get it up and running on The Things Network. It was easier than I thought.
Gateway Hardware
A gateway is an Internet-connected LoRa device that listens to multiple LoRa channels and forwards packets between the network backhaul (e.g. The Things Network) and the end device nodes it hears. Think of it like a cell tower for lower-power, mobile end device nodes. There are several gateways to choose from and I decided to try the RAK831 gateway from RAK Wireless, a Chinese company. The RAK831 is a LoRaWAN concentrator board that connects to a Raspberry Pi. I bought their LoRaWAN starter kit because it seemed to have everything you need.

In fact, it had more than I really needed. Here are the components that were essential to me:
- RAK831 LoRaWAN concentrator board
- Raspberry Pi 3 with SD card preloaded with all the drivers and setup for The Things Network
- Converter board to attach the RAK831 to the Raspberry Pi. This board also has a GPS receiver on it.
- GPS antenna
- Glass fiber antenna with 6dBm gain, so I could set up a tall antenna mast
- a 5 meter RG-58 tie line for the antenna
- heat sink for the concentrator board. I’m not sure it’s necessary.
The kit also came with a WisNode board which is like an Arduino + LoRa end device. It also came with a board called a LoRa Tracker, which I found useless because it requires some strange programming environment to use. Besides I had already designed my own end devices with GPS.
Configuration
I got a lot of information from this article on hackster.io about how to configure the Raspberry Pi to connect to The Things Network. Many of the steps are not necessary because the required software was preloaded. I did not have to enable SPI on the Raspberry Pi, or download the iC880a-based gateway software from GitHub. This had already been done.
I did set my WiFi credentials in /etc/wpa_supplicant/wpa_supplicant.conf as instructed.
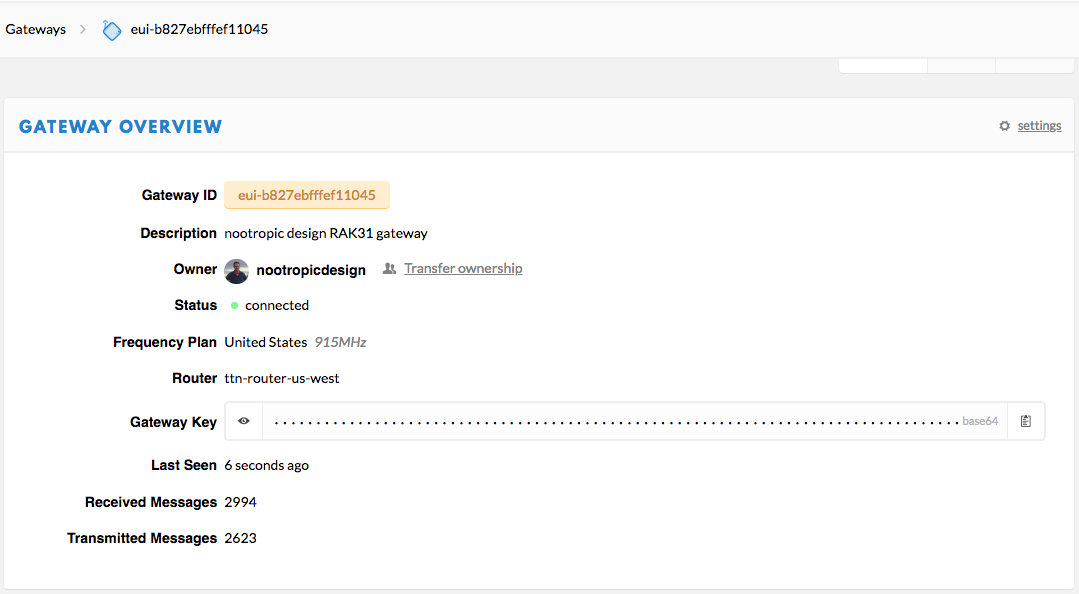
Then the main task is to set up the configuration file for the gateway. First, you need to determine the gateway ID. It is unique to the hardware because it is based on the MAC address of the network interface. Here’s a handy script to get it:
GATEWAY_ID=$(ip link show eth0 | awk '/ether/ {print $2}' | awk -F\: '{print $1$2$3"FFFE"$4$5$6}'); echo ${GATEWAY_ID^^}
Configuring the gateway is a little confusing. First, there’s a global configuration file that is not specific to your gateway but is specific to the region you are operating in (EU, US, Australia, etc.). I’m in the US, so I used the US global configuration file from the Things Network’s gateway-conf project on GitHub.
The gateway_conf section near the end is the important part. This has the correct router information for your region. This file goes in /opt/ttn-gateway/bin. IMPORTANT: in order for my gateway to work, I had to enable GPS in the global_config.json file by adding this to the gateway_conf section:
{
  "gateway_conf": {
  	...

    "gps": true,
    "gps_tty_path": "/dev/ttyAMA0",
    "fake_gps": false,

  	...
  }
}
Information specific to your gateway goes in a file /opt/ttn-gateway/bin/local_config.json. Here you use the key information from the global_config.json plus your gateway_ID, location information about where your gateway is, and contact info. Here’s mine:
{
  "gateway_conf": {
    "gateway_ID": "B827EBFFFEF11045",
    "servers": [
      {
        "server_address": "router.us.thethings.network",
        "serv_port_up": 1700,
        "serv_port_down": 1700,
        "serv_enabled": true
      }
    ],
    "ref_latitude": 45.0466,
    "ref_longitude": -93.4747,
    "ref_altitude": 277,
    "contact_email": "michael@nootropicdesign.com",
    "description": "nootropic design RAK831 LoRa gateway"
  }
}
When the gateway starts, the local_config.json info is merged with the global_config.json information.
The tricky thing is that your gateway configuration can be controlled by a remote file in GitHub. The gateway-remote-config GitHub repo is a collection of many local config files for TTN Gateways. When your gateway starts up, it actually pulls the latest content from GitHub. If it finds a file for your gateway, it removes the local_config.json file and creates a symbolic link from bin/local_config.json to the file in the cloned repo on your Raspberry Pi!
If you want to do this, fork the gateway-remote-config repo on GitHub, commit your own local config file to your forked repo named for your GatewayID (e.g. B827EBFFFEF11045.json), and then submit a pull request to the master repo. In a few days, your local configuration file will be merged and when your gateway starts, it will use it.
My final configuration is the /opt/ttn-gateway/bin/local_config.json which is a link to the
my config file in GitHub. The gateway_conf section in global_config.json simply contains this:
{
  "gateway_conf": {
    "gps": true,
    "gps_tty_path": "/dev/ttyAMA0",
    "fake_gps": false
  }
}
The Things Network
You’ll need to register your gateway on The Things Network using their registration instructions. This is easy.
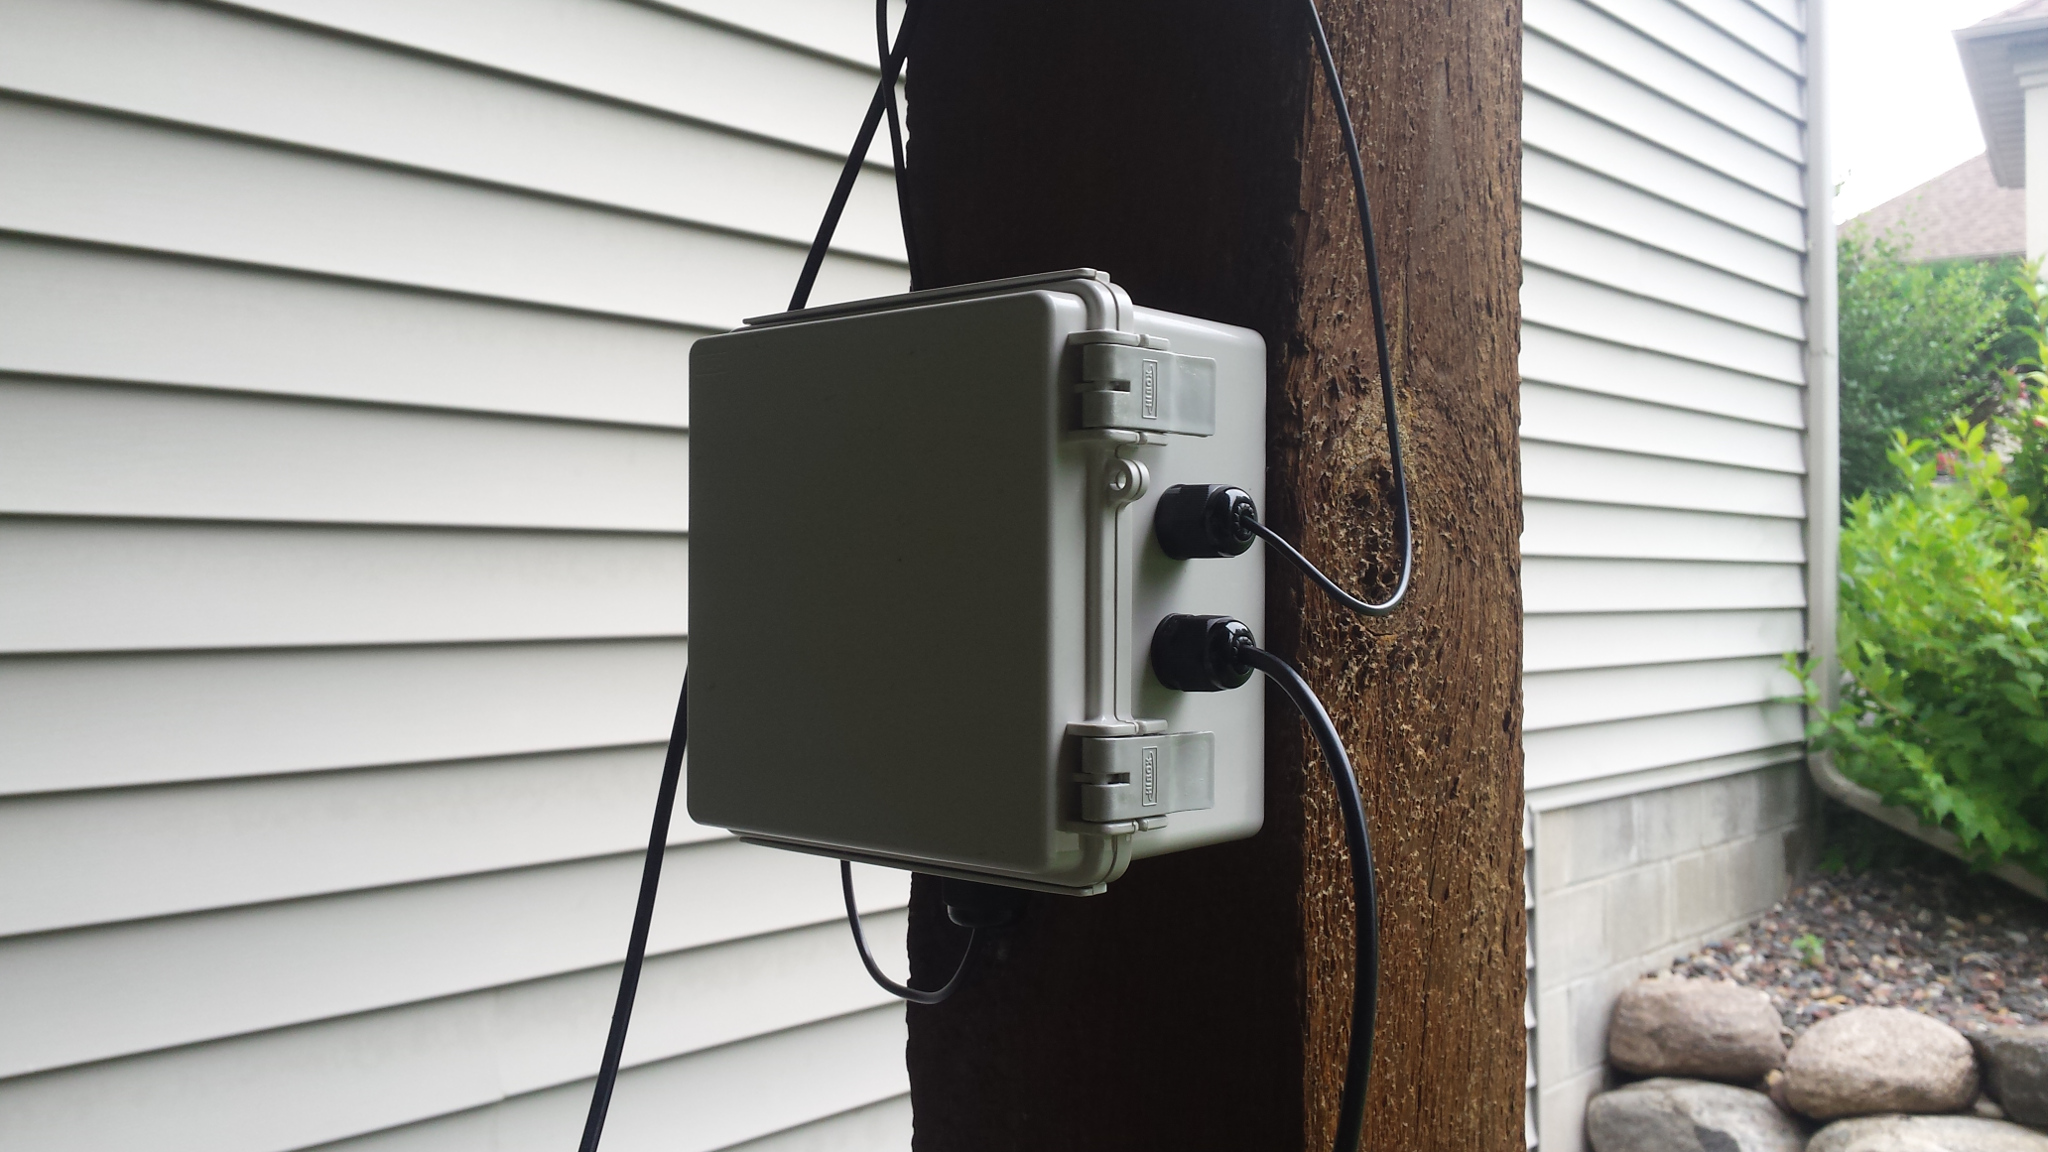
Enclosure and Antenna
I mounted my gateway in a waterproof enclosure with wires going in for the 5V power, LoRa antenna, and GPS antenna. It did not get too hot in the summer, and I will soon see how well it fares in a Minnesota winter. I am hoping that the heat generated by the enclosed Raspberry Pi will keep the hardware from freezing, but I have no idea! UPDATE: the Raspberry Pi had no problems even when it was -28F (-33C) !!!
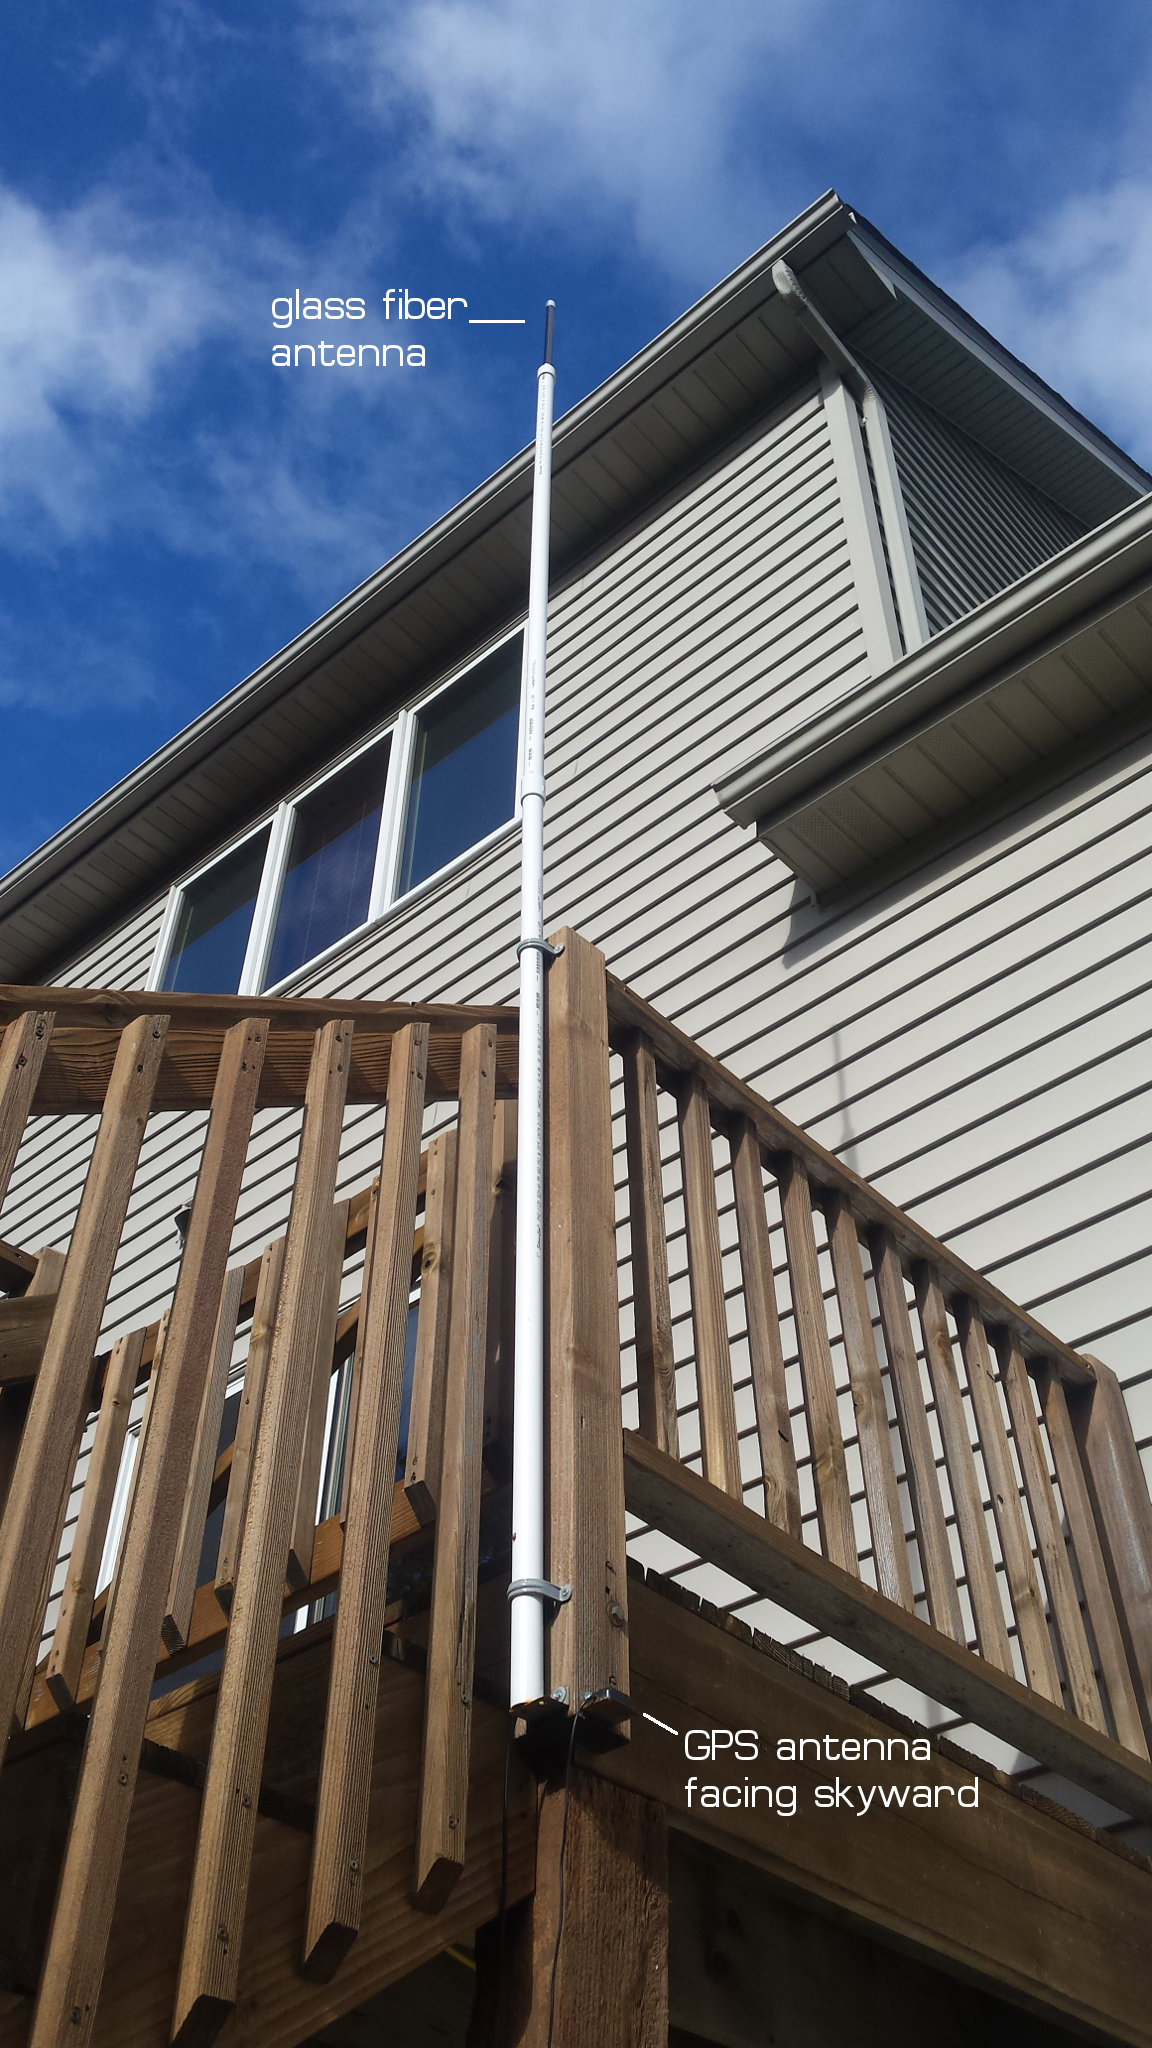
The antenna mast is PVC pipe and I used a 5 meter RG-58 cable to connect the concentrator board to the glass fiber antenna. There is power loss in 5 meters of cable, but the antenna still provides a net gain after accounting for this. I think it looks great and I hope my neighbors don’t think it is an eyesore.
In Part 2 of this article I’ll get into the details of using LoRaWAN nodes with the gateway. Stay tuned.
