Note: Rock7 Communications is now Ground Control
When deploying a microcontroller-based IoT solution or just doing experiments gathering data in the field, you often need a way to get the data back to your home base or to the cloud somehow. You’ve probably used WiFi, maybe dabbled with cellular solutions, but what about satellite communication? Sometimes satellite is the only option if you are in a remote area. Transmitting data via satellite has been possible for quite some time using a satellite modem like the RockBLOCK 9603 from Ground Control (previously Rock Seven Communications). I recently used this technology to build a solution for a customer, and it was SO FUN I wanted to write up something about it because there’s not very much info out there.
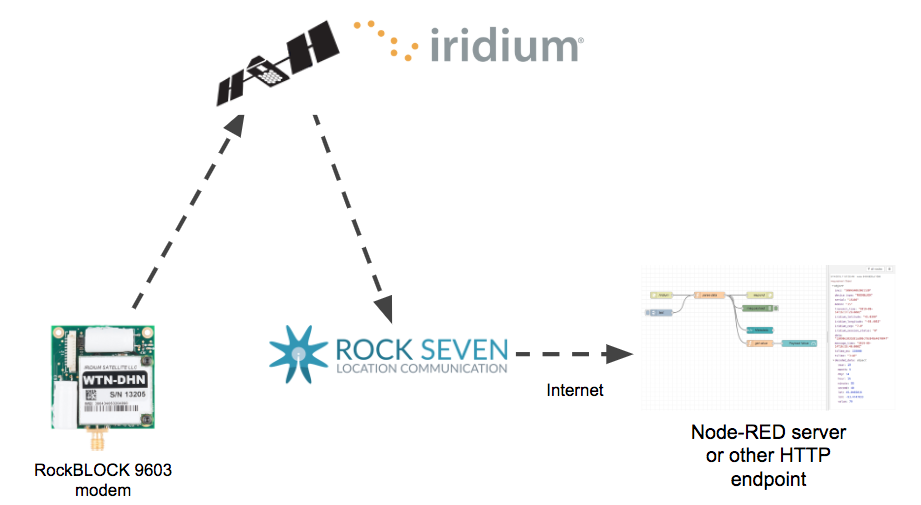
Here is the basic architecture of the solution. Data is transmitted to one of the 66 Iridium satellites and then downlinked to Rock Seven where it will then be sent over the Internet to your server via HTTP or even email. I’m using a Node-RED server as the destination endpoint.
One barrier is cost: the RockBLOCK 9603 costs $250, you’ll pay a monthly fee to keep the modem activated, and each message costs money. I’ll give more details on cost later, but if you have a mission critical system that needs to be monitored or controlled in a remote area, it can be easy to justify the costs. From a development perspective, the good news is that there is an excellent Arduino library called IridiumSBD that makes it very easy to send Iridium short burst data messages (full documentation here). You will also want to keep in mind that messages need to be short (few hundred bytes at most) and that sending a message can take several minutes. We’re not streaming video with this stuff.
Hardware
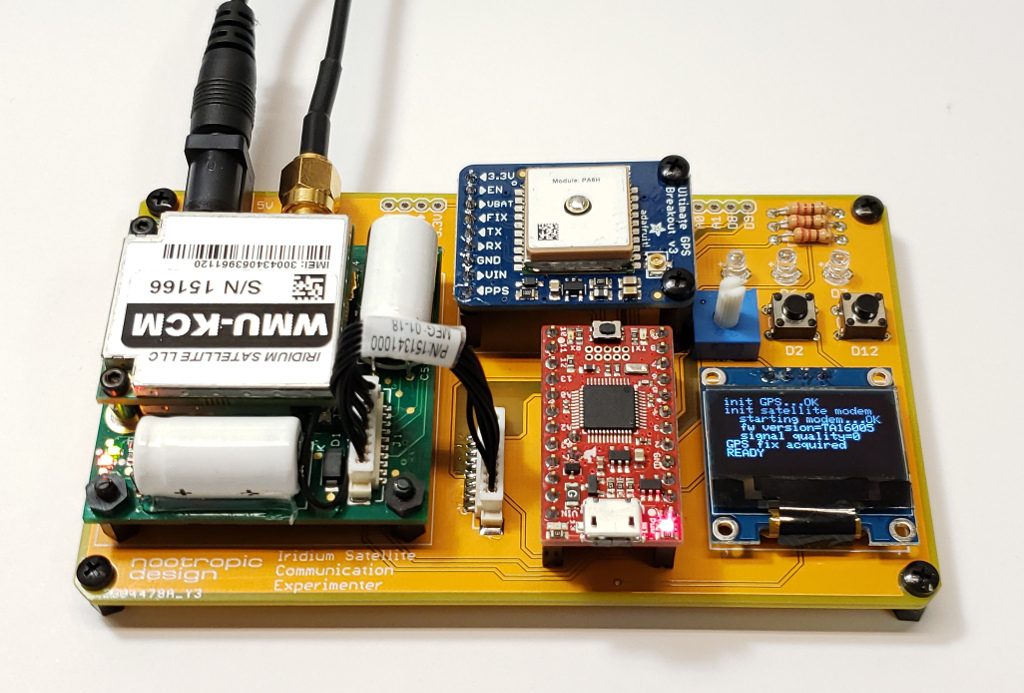
After I learned this technology, I decided to make a simple development board to make it easier to deal with the wiring and make it more portable. The RockBLOCK modem has a 10-pin Molex “PicoBlade” connector (Molex part number 15134-1001), but it was fairly easy to solder to the board. I used a SAMD21 microcontroller (the SparkFun SAMD21 mini breakout board is a great choice) because it is more powerful than a simple Arduino Uno and it has more hardware serial interfaces. I need one serial interface for a GPS module and one for the satellite modem. You might want one for serial communication to some other device, too! It’s good to have lots of hardware serial interfaces. I have grown tired of using software serial, as it can introduce problems and I don’t have time for that.
The board also has an Adafruit GPS breakout board for plug-n-play GPS. I just put female headers on the board so I can redeploy the SAMD21 and GPS boards in other solutions someday. I also added an SSD1306 OLED display for output and a few LEDs with 220 ohm resistors, along with some buttons and a 10K pot for input. These are just generic parts. The Eagle design files are in the project GitHub repository.
Rock Seven Account
To use the modem, it has to be registered with Rock Seven Communications. You have to pay a monthly line rental fee to keep it active on the network, and you have to buy credits that are used up as you send messages. Rock Seven is a British company, so all the prices are in GBP. Line rental costs £12 per month (click for conversion to U.S. dollars), and 100 credits costs £13. It costs one credit for every 50 bytes in a message. A message sent from a modem can be up to 340 bytes, and that would cost you 7 credits. As a system designer, I was highly motivated to keep my messages under 50 bytes!
You also use your Rock Seven account to tell Rock Seven what to do with the messages when they get them from the Iridium constellation. This is called a “delivery group”. I’m having Rock Seven do an HTTP POST to my Node-RED server. Note that there doesn’t seem to be any security; I can’t specify a username and password for my server, so “security by obscurity” is the simple approach. That’s why I’m not showing you my AWS server name in this image. All the info you need about the integration between Rock Seven and your application can be found here.
Communication Experiments
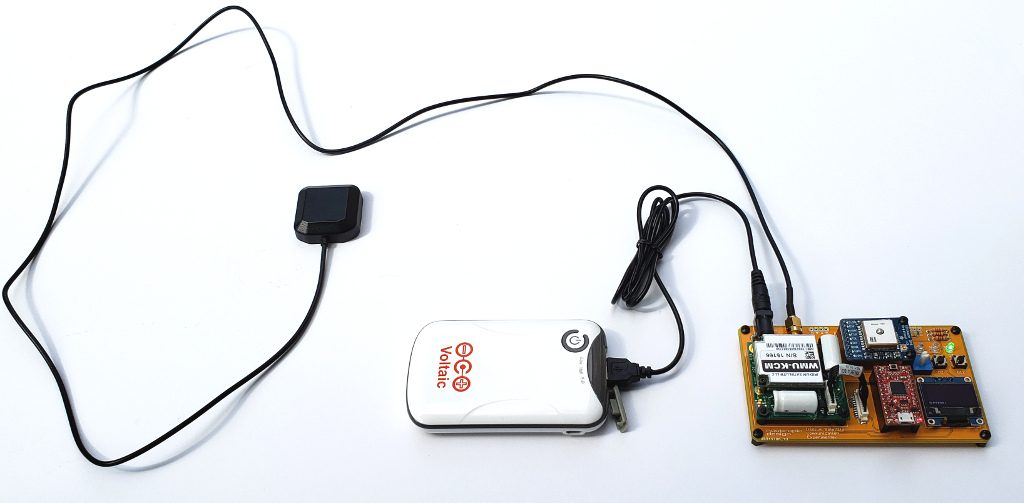
For my experimentation I use an external antenna but the default configuration is to use a built-in patch antenna which works fine. You will need a clear view of the sky — satellite communication typically won’t work indoors (although I have successfully sent messages from indoors very near a window). For power, I’m using a portable 5V supply.
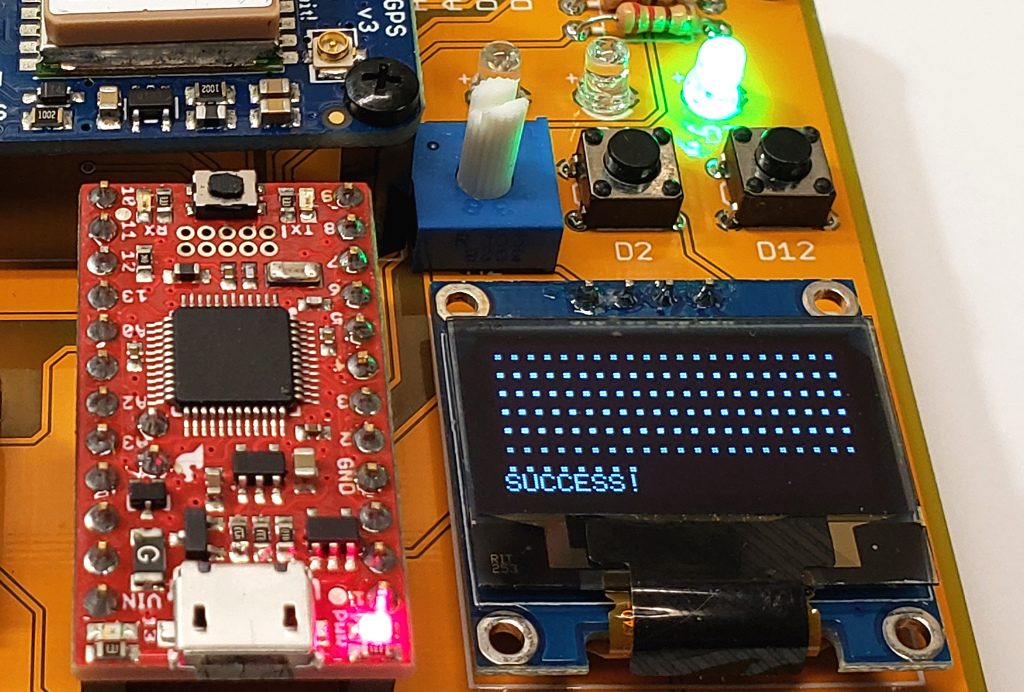
My Arduino program just lets you input a number from 1-100 using a potentiometer to show how data can be transmitted. I’m also transmitting the GPS coordinates and the time of the sensor reading. Keep in mind that sending a message can take several minutes. The IridiumSBD library can call a callback function you specify so you can do things during the long transmission time, like control an LED and print output. Once you tell the library to send a message, it will keep trying to contact an Iridium satellite, as it may take a while for one of the 66 satellites to fly over your area. The default timeout in the library is 5 minutes. If my program fails to send the message in 5 minutes, the red LED comes on. If successful, the green LED is lit.
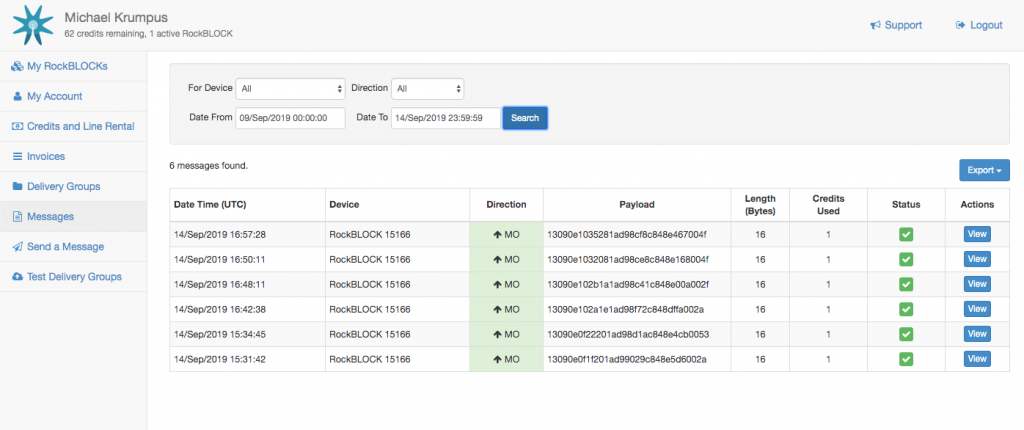
The payload of my message to the satellite is 16 bytes: 6 bytes for the timestamp (year, month, day, hour, minute, second), 4 bytes each for latitude and longitude, and two bytes for the data value. The Rock Seven management console lets you see the messages received by Rock Seven and forwarded to your destination server. The payload is sent as hexadecimal, so my 16 byte message is actually sent as 32 HEX characters to my server.
Processing Messages
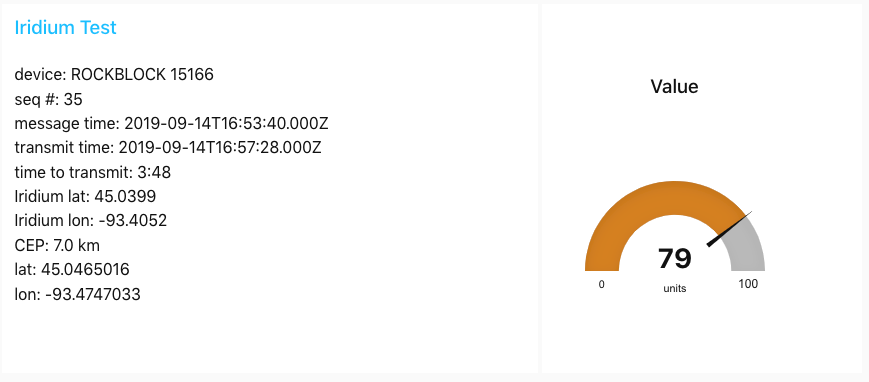
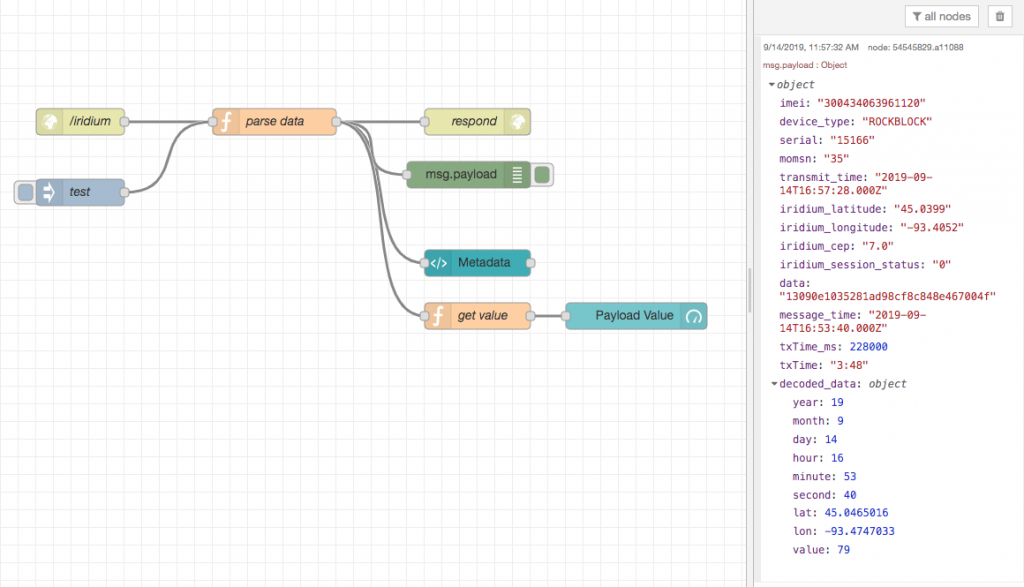
After receiving the data over the Internet from Rock Seven, you can do whatever you want with it. I am processing the messages with a Node-RED server and displaying the received value on a web dashboard.
Along with the payload, Rock Seven delivers metadata, including the time at which the satellite received the message. I compare this to the time that the microncrontroller started sending the message so we know how long the process really took. In this case, it took 3 minutes and 48 seconds to successfully transmit to a satellite. The data also provides an approximate GPS location where it thinks your modem is. This is the CEP parameter in the metadata. This can be off by several kilometers, so if you are interested in actual location, you will need to use a real GPS module, like I am.
Here is the JavaScript code in the function node “parse data”. The decoded data is passed along to the dashboard display widgets.
var data = msg.payload.data;

var p = 0;
var year = parseInt(data.substr(p,2), 16);
p += 2;
var month = parseInt(data.substr(p,2), 16);
p += 2;
var day = parseInt(data.substr(p,2), 16);
p += 2;
var hour = parseInt(data.substr(p,2), 16);
p += 2;
var minute = parseInt(data.substr(p,2), 16);
p += 2;
var second = parseInt(data.substr(p,2), 16);
p += 2;

var latString = data.substr(p,8);
var lat = parseInt(latString, 16);
// can be negative, so check for sign bit
if (lat & 0x80000000) {
    lat = lat - 0x100000000;
}
lat = lat / 10000000.0;
p += 8;

var lonString = data.substr(p,8);
var lon = parseInt(lonString, 16);
// can be negative, so check for sign bit
if (lon & 0x80000000) {
    lon = lon - 0x100000000;
}
lon = lon / 10000000.0;
p += 8;


var valueString = data.substr(p,4);
var value = parseInt(valueString, 16);


// time that the message was created and ready to send
var msgTime = new Date(year+2000, month-1, day, hour, minute, second);
msg.payload.message_time = msgTime;

// time that the message was actually successfully transmitted to satellite
var txTime =  new Date("20" + msg.payload.transmit_time);
msg.payload.transmit_time = txTime;

var txMilliseconds = txTime.getTime() - msgTime.getTime();

var txMinutes = Math.floor(txMilliseconds / 60000);
var txSeconds = (txMilliseconds % 60000) / 1000;
var txTimeString = txMinutes + ":" + txSeconds;
msg.payload.txTime_ms = txMilliseconds;
msg.payload.txTime = txTimeString;

msg.payload.decoded_data = {
   year: year,
   month: month,
   day: day,
   hour: hour,
   minute: minute,
   second: second,
   lat: lat,
   lon: lon,
   value: value
}
return msg;
Resources
GitHub repo with the code used in this project and the board design files
RockBLOCK 9603 modem documentation
GitHub repo for IridiumSBD library
Detailed documentation for IridiumSBD library
Going Further
There are some things I haven’t tried yet. A satellite modem can actually receive messages from your server via Rock Seven. I also think it is important to design a security solution. A shared secret between the modem and Internet application may be sufficient, but deploying secrets to IoT devices has its own complexity. I could send a security token to the modem securely because sending a message to a modem requires Rock Seven credentials. The modem could then present the security token in each message, and the endpoint processor could require it. I think this would be reasonably secure, but the security token would take up valuable bytes in each message.
Summary
Using a Rock Seven Iridium modem is a lot of fun and it can be an important part of an IoT solution when you don’t have other connectivity options. It’s not cheap, you need a clear view of the sky, and it can take several minutes to send a short message. But if you can design a solution within those constraints like I have, it’s completely viable. And special thanks to Mikal Hart for writing the awesome Iridium SBD library!


hi there, this was really an awesome piece
When using https, the path and query parameters are encrypted in the same way as the request body or authentication headers. So you can simply specify your password in the url.
Thanks for writing this up. I was curious about adding a satellite tracker to a drone, and this is a great start.
TR130 is a GPS location service supplier for vehicle and ship. It hasiridium SBD transceiver, which provides globe service, suppliessatellite communications where no GSM signal coverage. It embedded with high sensitivityGPS antenna and GSM antenna.
Where can I get the board everything is soldered to?
I don’t have any more boards, but I could send you the Eagle files if you are willing to get some boards made yourself. I’m just talking about bare PCBs, not populated.
Hi Michael ! two question… Where can I get the board (PCB) everything is soldered to?
Could you give me a list of the devices that are assembled on the PCB?
Could you help me?
I thank you in advance!
I’m afraid I don’t have any more boards, but if you have the ability to get a board made, I can send you the design files (Eagle) and give guidance on components.
Thank you very much Michael !!!… my email todo1genio@gmail.com, I appreciate if you could send me all the information and also provide the info of the components, it would be great!!!..
I appreciate you reply.
bests regards,
Nathan
All the parts are described in the “Hardware” section of the article and the Eagle board files are in the GitHub repository, as stated in the article.
Thank Michael !
Hi Micheal, Thanks so much for doing this and sharing your project with the world. I am also interested in the Eagle files and also guidance to build this. Would really appreciate your help. I am interested to rebuild this.
All the parts are described in the “Hardware” section of the article and the Eagle board files are in the GitHub repository, as stated in the article.
hi, may i know can it be used in malaysia?
I’m doing the same thing in the flow, but I don’t know how to write in the node http in /iridium
The /iridium node is just an HTTP input node that uses the POST method. There’s no code in this node.
Hi Michael,
Thanks for writing this up, I have followed it and found it super helpful.
Rather than having to use your Function Node with code to “parse data”, I found there is a community contributed Node called “buffer-parser” that now does all of that hard work in a GUI configurable NodeRED Node.
The website for it is https://flows.nodered.org/node/node-red-contrib-buffer-parser
To add it to your Node-RED for use do the following;
1. Open the menu in Node-RED
2. Select “Manage Palette”
3. Click on the “Install” tab
4. Search for and select “node-red-contrib-buffer-parse”
5. Click on “Install”.
You should then find two new Blue Nodes available at add to your flow, they will be called “buffer – parser” and “buffer – maker”
I will try and write up how I used it to parse my Iridium/Rock7 data and then provide a link here.
Thanks,
Paul
Thanks, very useful nodes.
I have put my flow here on GitHub in case its useful to anyone.
https://github.com/pauljeffress/Pulsar-Node-RED
Cheers,
Paul
Paul.jeffress@gmail.com
What is your speed ?
Hello,
Do you sell the board for this project?
https://nootropicdesign.com/projectlab/2019/09/21/arduino-satellite-communication/
If so, would is have i/o pins to control other hardware like sensors, lights, and a dc motor?
Thank you!
I have some spare boards from this project and could send you one if you are in the U.S. Email me at michael at nootropicdesign.com so we can connect.
Hi, I’d be interested to work with you for a project, where can I contact you?
I saw your video in YouTube and I have problem for RockBlock on raspberry
I use raspberry pi 4
Can you send me video how I can connect RockBlock on raspberry software
Please help, thanks
It good but next time can you give us circuit and explain that in deep