UPDATE: All NOAA APT satellites (NOAA-18, NOAA-19, NOAA-15) were decommissioned in 2025. NOAA-15 was decommissioned and stopped transmitting imagery at 15:28 UTC on August 19. You can see my very last received images on my site.
Project source code at GitHub: wx-ground-station

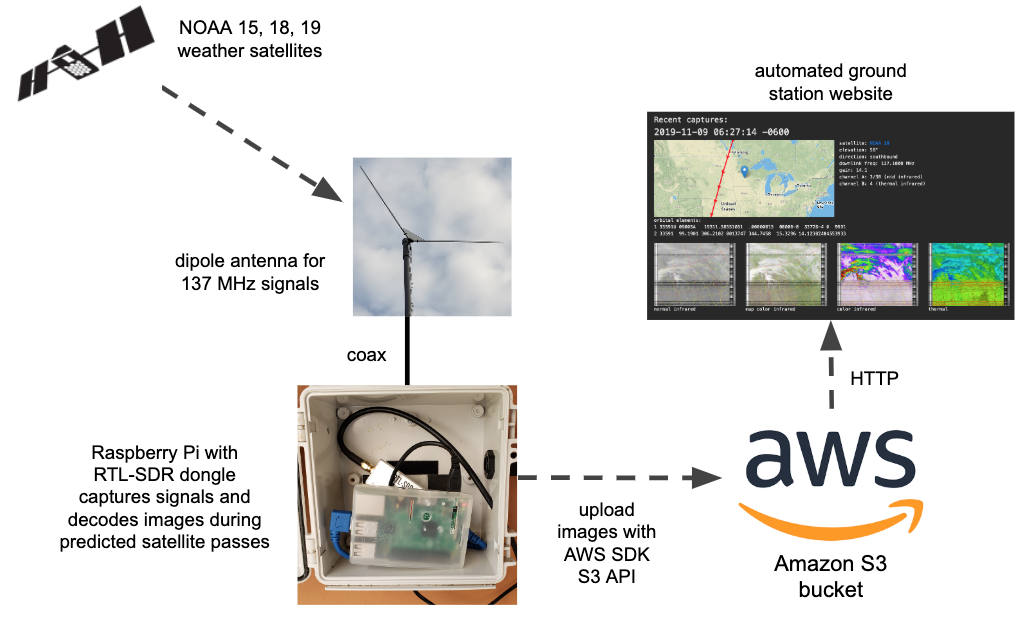
This project will show you how to create a fully automated ground station that will receive and decode NOAA weather satellite images and upload them to your own website served from an Amazon AWS S3 bucket. With this project you don’t need your own server or have to run your own website infrastructure. Have a look at my AWS site that is updated automatically all day long.
Oh, you want a site like this, too? Full of images you decoded from space? Then let’s get started, my friend.
Here’s what you’ll need:
- a modern Raspberry Pi (version 3 or 4), probably with Wi-Fi since it may be deployed outdoors. I used a RPi 3 model B. I have heard that a RPi Zero may not be powerful enough.
- an RTL-SDR dongle. I recommend the RTL-SDR V3 dongle from the excellent RTL-SDR.COM blog.
- an AWS account for hosting images and web content in an Amazon S3 bucket. You can sign up for the free tier for a year, and it’s still cheap after that.
- a simple dipole antenna with elements 21 inches (53.4 cm) long and that can be adjusted to have a 120 degree angle between the elements. Here’s a great article on design or you can just buy this dipole kit, also from the RTL-SDR.COM blog.
- coaxial cable to go from your antenna to Raspberry Pi + RTL-SDR dongle. The dipole antenna kit comes with 3m of RG174 coax, but I used 10 feet of RG58 coax.
This is a very long article with lots of steps, so take your time — I won’t be able to help everyone debug all their issues. I won’t go into the details of using a Raspberry Pi for the first time — this project assumes you know your way around the Pi and are comfortable with installing software on it. If you have never used AWS before, I suggest you set up an account and get familiar with what S3 is.
Weather Satellites and RTL-SDR
This probably isn’t the first you’ve read about using a software defined radio (SDR) to receive weather satellite images. This type of project has been documented before. Sometimes the emphasis is on software defined radio hardware and techniques, sometimes it’s about antenna design, or maybe the article is written by a real weather enthusiast who always use the abbreviation “wx” for weather. I’m not an expert in any of these areas, but the idea of receiving images directly from weather satellites as they fly overhead has intrigued me for many years. This has all gotten a lot easier with RTL-SDR dongles, more powerful Raspberry Pi computers and simpler antenna designs that get the job done. I gave this project a try recently using this well-written Instructables article, a totally hacked-together antenna I made, and a very old rtl-sdr dongle:

and on my very first attempt, I decoded this image from NOAA19 as it passed over my area:
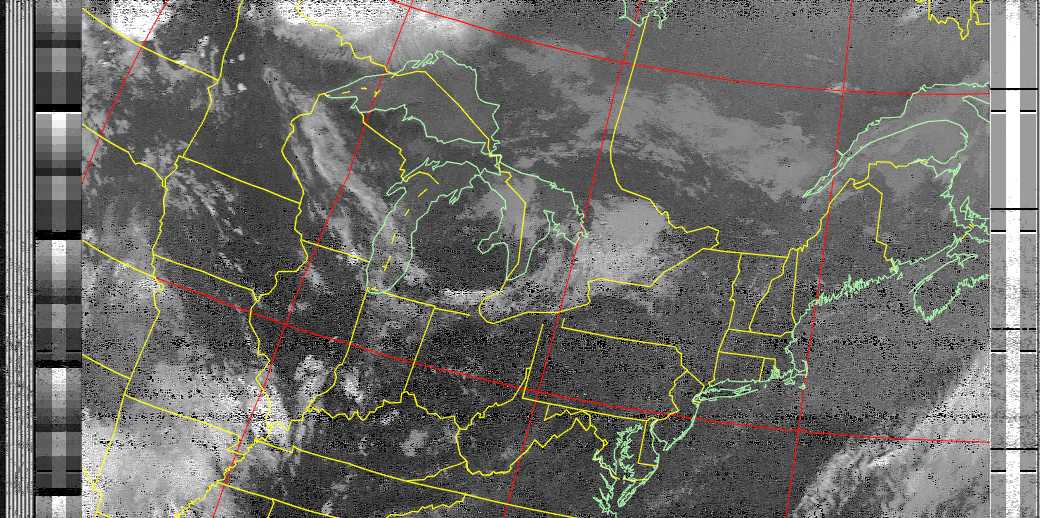
From that moment, I was hooked. I played around with different antennas and such, but found it tedious to always copy the images from my outdoor Raspberry Pi to my computer so I could look at them. I resolved to automate the uploading of images to an S3 bucket and to improve upon the scripts from the Instructables article. This is the overall solution:
Amazon AWS Setup
Your ground station website functionality will be completely in client-side JavaScript. It will use the AWS JavaScript SDK to make API calls to S3. The scripts that run on the Raspberry Pi also use some Node.js scripts to upload to S3. There are a lot of steps to get everything set up:
AWS SDK Credentials
The scripts that run on the Raspberry Pi use some Node.js scripts and the AWS JavaScript SDK to upload to S3. You need to get your credentials. These two articles show you how to get your credentials and store them for Node.js access:
Getting your credentials
Loading Credentials in Node.js from the Shared Credentials File
Your credentials file on the Raspberry Pi ~/.aws/credentials will look like this:
[default]
aws_access_key_id = YOUR_ACCESS_KEY_ID
aws_secret_access_key = YOUR_SECRET_ACCESS_KEY
Also set the default region where your S3 bucket will reside in ~/.aws/config. For example:
[default]
output = json
region = us-west-2
Create an S3 Bucket
Now create an S3 bucket for public website hosting. I’m using the bucket name nootropicdesign.wx for mine. The instructions are in this article:
Setting up a Static Website
At this point you should be able to load a simple web site from your new bucket. You might want to upload a simple index.html file and try to load it in your browser with http://BUCKETNAME.s3-website-REGION.amazonaws.com/.
<!doctype html>
<html>
  <head><title>S3 test</title></head>
  <body>Hello from S3</body>
</html>
Create an Identity Pool in Cognito
To give public users the ability to access your S3 bucket using the AWS SDK, you need to set up an identity pool and create a policy allowing them read access to your bucket. This is done using Amazon Cognito. A good guide for granting public access to your bucket is described in this article that shows how to serve images from an S3 bucket (just like we are). It’s somewhat confusing to follow the steps, so take your time.
Step 1: create an Amazon Cognito identity pool called “wx image users” and enable access to unauthenticated identities. Be sure to select the region in the upper right of the page that matches the region where your S3 bucket was created! Make note of the role name for unauthorized users, e.g. “Cognito_wximageusersUnauth_Role“.
Step 2: on the Sample Code page, select JavaScript from the Platform list. Save this code somewhere, because we need to add it to the web content later. It looks something like this:
// Initialize the Amazon Cognito credentials provider
AWS.config.region = 'us-west-2'; // Region
AWS.config.credentials = new AWS.CognitoIdentityCredentials({
  IdentityPoolId: 'us-west-2:1d02ae39-3a06-497e-b63c-799a070dd09d',
});
Step 3: Add a Policy to the Created IAM Role. In IAM console, choose Policies. Click Create Policy, then click the JSON tab and add this, substituting BUCKET_NAME with your bucket name.
{
   "Version": "2012-10-17",
   "Statement": [
      {
         "Effect": "Allow",
         "Action": [
            "s3:ListBucket"
         ],
         "Resource": [
            "arn:aws:s3:::BUCKET_NAME"
         ]
      }
   ]
}
Click Review policy and give your policy a name, like wxImagePolicy.
In IAM console, click Roles, then choose the unauthenticated user role previously created when the identity pool was created (e.g. Cognito_wximageusersUnauth_Role). Click Attach Policies. From the Filter policies menu, select Customer managed. This will show the policy you created above. Select it and click Attach policy.
Step 4. Set CORS configuration on the S3 bucket. In the S3 console for your bucket, select Permissions, then CORS configuration.
<?xml version="1.0" encoding="UTF-8"?>
<CORSConfiguration xmlns="http://s3.amazonaws.com/doc/2006-03-01/">
    <CORSRule>
        <AllowedOrigin>*</AllowedOrigin>
        <AllowedMethod>GET</AllowedMethod>
        <AllowedMethod>HEAD</AllowedMethod>
        <AllowedHeader>*</AllowedHeader>
    </CORSRule>
</CORSConfiguration>
Raspberry Pi Setup
Most of these instructions are from steps are from steps 2 and 3 of the Instructables article I mentioned earlier.
Install Required Packages
First, make sure your Raspberry Pi is up to date:
sudo apt-get update
sudo apt-get upgrade
sudo reboot
Then install a set of of required packages.
sudo apt-get install libusb-1.0
sudo apt-get install cmake
sudo apt-get install sox
sudo apt-get install at
sudo apt-get install predict
I used Node.js in some of the scripting, so if you don’t have node and npm installed, you’ll need to do that. In depth details are here, and I easily installed with:
curl -sL https://deb.nodesource.com/setup_10.x | sudo -E bash -
sudo apt-get install -y nodejs
Using your favorite editor as root (e.g. sudo vi), create a file /etc/modprobe.d/no-rtl.conf and add these contents:
blacklist dvb_usb_rtl28xxu
blacklist rtl2832
blacklist rtl2830
Build rtl-sdr
Even if you have rtl-sdr already built and installed, it’s important to use the version in the GitHub repo keenerd/rtl-sdr, as this version’s rtl_fm command can create the WAV file header needed to decode the data with sox.
cd ~
git clone https://github.com/keenerd/rtl-sdr.git
cd rtl-sdr/
mkdir build
cd build
cmake ../ -DINSTALL_UDEV_RULES=ON
make
sudo make install
sudo ldconfig
cd ~
sudo cp ./rtl-sdr/rtl-sdr.rules /etc/udev/rules.d/
sudo reboot
Install and Configure wxtoimg
The program wxtoimg is what does the heavy lifting in this project. It decodes the audio files received by the RTL-SDR receiver and converts the data to images. The original author of wxtoimg has abandoned the project, but it is mirrored at wxtoimgrestored.xyz.
wget https://wxtoimgrestored.xyz/beta/wxtoimg-armhf-2.11.2-beta.deb
sudo dpkg -i wxtoimg-armhf-2.11.2-beta.deb
Now run wxtoimg once to accept the license agreement.
wxtoimg
Create a file ~/.wxtoimgrc with the location of your base station. As usual, negative latitude is southern hemisphere, and negative longitude is western hemisphere. Here’s my location in Minnesota, USA.
Latitude: 45.0468
Longitude: -93.4747
Altitude: 315
The program predict is used by the automated scripts to predict weather satellite orbits. Run predict to bring up the main menu:
                           --== PREDICT  v2.2.3 ==--
                     Released by John A. Magliacane, KD2BD
                                    May 2006


                            --==[ Main Menu ]==--


 [P]: Predict Satellite Passes          [I]: Program Information
 [V]: Predict Visible Passes            [G]: Edit Ground Station Information
 [S]: Solar Illumination Predictions    [D]: Display Satellite Orbital Data
 [L]: Lunar Predictions                 [U]: Update Sat Elements From File
 [O]: Solar Predictions                 [E]: Manually Edit Orbital Elements
 [T]: Single Satellite Tracking Mode    [B]: Edit Transponder Database
 [M]: Multi-Satellite Tracking Mode     [Q]: Exit PREDICT
Select option ‘G’ from the menu to set your ground station location:
                *  Ground Station Location Editing Utility  *


                        Station Callsign  : KD0WUV
                        Station Latitude  : 45.0468 [DegN]
                        Station Longitude : 93.4747 [DegW]
                        Station Altitude  : 315 [m]


            Enter the callsign or identifier of your ground station
You can enter whatever you want for the callsign (I used my amateur radio callsign). When entering the longitude, note that positive numbers are for the western hemisphere and negative numbers are for the eastern hemisphere. This is opposite convention, so make sure you get this right or you’ll be listening when there’s no satellite overhead!
Get the Automation Scripts and Configure
I’ve completely refactored the scripts originally posted in the Instructables article and added Node.js scripts for creating thumbnail images and uploading all images to S3. The git repo can be cloned anywhere on your Raspberry Pi. The configure.sh script sets the installation directory in the scripts and schedules a cron job to run the satellite pass scheduler job at midnight every night.
git clone https://github.com/nootropicdesign/wx-ground-station.git
cd wx-ground-station
sh configure.sh
cd aws-s3
npm install
In the file aws-s3/upload-wx-images.js set REGION, BUCKET, and LOCATION to the correct values. This Node.js script prepares the images for upload by creating thumbnail images, printing some metadata on the images, and creating a JSON metadata file for each image capture. The LOCATION string will be printed on the images that you capture. Here are my values just for reference.
var REGION = "us-west-2";
var BUCKET = "nootropicdesign.wx";
var LOCATION = "nootropic design ground station, Plymouth, Minnesota, USA  45.0468, -93.4747";
Also set the REGION and BUCKET correctly in the files aws-s3/upload-upcoming-passes.js and aws-s3/remove-wx-images.js. Plug in your own values:
var REGION = "us-west-2";
var BUCKET = "nootropicdesign.wx";
Now we need to make some changes to the web content. The web interface uses Mapbox to draw the live maps of the next upcoming satellite pass. You’ll need to create an account at Mapbox to get an access token. Their free tier lets you load 50,000 maps/month, so you are not likely to have any real costs. When logged into Mapbox, get your account token from https://account.mapbox.com/.
Now in the file website/wx-ground-station.js, set your bucket name, AWS region, AWS credentials (the Cognito identity pool info you saved above), Mapbox token, and your ground station info. Some of my values are shown here for reference.
var bucketName = 'nootropicdesign.wx';
AWS.config.region = 'us-west-2'; // Region
AWS.config.credentials = new AWS.CognitoIdentityCredentials({
    IdentityPoolId: 'us-west-2:1d02ae39-30a6-497e-b066-795f070de089'
});

// Create a mapbox.com account and get access token
const MAP_BOX_ACCESS_TOKEN = 'YOUR_MAPBOX_TOKEN';
const GROUND_STATION_LAT =  45.0468;
const GROUND_STATION_LON = -93.4747;
const GROUND_STATION_NAME = 'my ground station';
Upload the Web Content to S3
Upload the the contents of the website directory to your S3 bucket using the S3 console. Since you probably edited the files on your Raspberry Pi, you might need to copy them to your computer where you are accessing AWS using a browser. Whatever the case, these files need to be uploaded to the top level of your bucket. IMPORTANT: be sure to grant public access to the files when you upload them!
index.html
wx-ground-station.js
tle.js
logo.png
Of course, you can replace logo.png with your own, or just remove the <img> tag from index.html.
Test Everything Out
Now that everything is configured, let’s run the scheduling script to schedule recording of upcoming satellite passes. This way you can have a look today instead of waiting until they get scheduled at midnight. This step will also upload a JSON file with the upcoming passes info to your website.
cd wx-ground-station
./schedule_all.sh
You can now visit your AWS S3 website endpoint at
http://BUCKETNAME.s3-website-REGION.amazonaws.com/
Once again, mine is here: http://nootropicdesign.wx.s3-website-us-west-2.amazonaws.com/
Even though you don’t have any images captured, you should be able to see the next upcoming pass. The next thing to do is make sure the scripts work correctly to record the audio file, process it into images, and upload to your bucket. You can watch the logs in the wx-ground-station/logs to debug any errors.
The wxtoimg enhancements that are displayed depends on what sensors were active when the images were captured. If sensors 3 and 4 were active (usually at night), then the thermal enhancement will be shown. Otherwise a multispectral analysis enhancement will be shown.
Not all images you capture will be good. I feel lucky if even half of my satellite passes produce recognizable images. You can clean up bad ones by using the script aws-s3/remove-wx-images on the Raspberry Pi. Just provide the key to the particular capture as an argument to remove all the images and the metadata from the S3 bucket.
node aws-s3/remove-wx-images NOAA19-20191108-162650
Hopefully in the next few hours you’ll be able to see some images uploaded, depending on when satellites are scheduled to fly over. You may get up to 12 passes per day, usually 2 for each of the NOAA satellites in the morning, then 2 more for each of them in the evening. Let us know if this project worked for you!
Fine Tuning
The script receive_and_process_satellite.sh uses the rtl_fm command to read the signal from the RTL-SDR receiver. The -p argument sets the PPM error correction. I have mine set to 0, but you may want to adjust. See this article for details.
I have also installed a low noise amplifier (LNA) to improve my reception (results are mixed). My LNA can be powered with a bias tee circuit and controlled with the rtl_biast command. If you are using an LNA like this, you can install rtl_biast as documented here and uncomment the rtl_biast lines in receive_and_process_satellite.sh which turn the LNA on and off.

I built a NOAA receiver using mostly what you have written up here. I’m going for the approach of no web server or uploading to another website. The Pi records a .wav file at the right time and long enough till the satellite has passed. The problem is that when it processes the .wav file i get nothing but snow for a .png. I have listened to the .wav file and I don’t here the satellite at all, just static. I have checked the Antenna with LNA and it works fine. I have checked the receive_and_process_satellite.sh against many other web sites and they all differ a lil, but the core things are correct.
Has anyone else had just static recorded when the satellite passes?
I think you should be able to hear satellite signals when they are overhead even with the simplest of antennas. Are you sure you have your lat/lng location set properly and that you are running the predictions off of a recent TLE file?
I had the same problem – and after troubleshooting realized it is because my coordinates in ~/.predict/predict.cfg were wrong – for longitude [degW] I used a negative number, like I am used to for all western hemisphere coordinates. But predict uses the opposite scheme. So, if you live in North or South America, your value for Longitude should probably be a POSITIVE number.
Thanks for the clear and detailed instructions. I was able to get this working in no time!
Thank you so much for taking the time to leave this comment. Have fun!
Hello Michael, first than all thank you for your clear instructions.
Now I have an antenna working in the chilean Patagonia :-D
http://fgigas-wx.s3-website-us-west-2.amazonaws.com/
Thanks for the note! Your images look great.
Great instructions. I put together almost identical setup but used the diapole antenna that came with the rtl_sdr and tuned it to 137 mHz. Got a few good pictures from NOAA 15 but not from 18 and 19. My antenna is currently in an upstairs bedroom which is probably not a good location. I am building hopefully a better diapole antenna and will place it in a more open space.
Hi Michael,
Awesome project and perfect explanation to follow! Took a while to setup but it’s running perfectly!
I just have one question: On the website that shows the passes and the images, the main heading is always “Invalid Date”. Why would that be and where can I look to try and resolve it?
John
Can you provide a link to the site so I can look? Or email it to michael@nootropicdesign.com if you don’t want to post here.
Thanks for the tutorial. Here’s my problem. I see that images are being uploaded to the “images” folder on S3, but I don’t see them on the webpage. I get this error: Error getting image metadata: There was an error viewing the directory: Missing credentials in config. Any ideas? Thanks!!!
http://k4dca.s3-website.us-east-2.amazonaws.com/
Double check your work regarding the section in the article above called “AWS SDK Credentials”. You may have missed a step. Also, there might be a problem with your S3 bucket permissions, as I get a “403 Forbidden” on load wx-ground-station.js in my browser. This project has so many detailed steps — just double check everything carefully.
Michael, thank you so much for your reply! I really appreciate your help becuase I have been stuck on this problem for a while now. I have corrected the S3 bucket credentials, so the wx-ground-station.js file should be readable now. I didn’t realize that I needed to change the permissions everytime I upload a new file. Now I know!
With regards to the “AWS SDK Credentials” I rechecked all the steps. I obtained a root Access Key ID and Secret Access Key, added the two files (credentials and config) to a folder called “.aws” in home/pi.
One thing I did not do, was anything after this step “After setting the environment variable (if needed), you can run a file named script.js that uses the SDK as follows:” in this link: https://docs.aws.amazon.com/sdk-for-javascript/v2/developer-guide/loading-node-credentials-shared.html. Is that step necessary? If so, how do you do that on the Pi command line?
One good sign, (to me at least) is that I can see the satellite images ARE being uploaded to my S3 bucket in the “images” folder. I can also see the correct “next image capture” as text on the top of my index page.
Thanks again, any tips or ideas are greatly appreciated.
Nevermind! I think I figured it out. The Identity pool ID was incorrect. Everything seems to be working now. Thank you for the tutorial!!!
Awesome — good images from northern Virginia! Have fun.
Hey, I just got an email from amazon aws and it says that I’ve exceeded 85% of my free tier usage for the month of April. It says 17,000 requests and that the free tier only supports 20,000 Get Requests. I haven’t shared my noaa satellite link with anyone and i’ve only checked it a couple dozen times. Any ideas why this number is so high?
Looks like something Im about to have a play with, Instead of using Amazon is there a way this can be uploaded to a normal web host rather than amazon, Or would I be just as well puttling in a link on the website. Im in the process of updating my website http://www.skippyinspace.com/allsky as Im just in the last phase of testing a meteor camera.
Thanks
It looks like your RTL/PI setup is in a weather proof enclosure. How are you powering it. Land power or solar? If solar how big a panel and battery does it seem to require?
It is powered by mains power, not solar. I have a weatherproof box for power connections, too.
Have your tried your project with a slightly different setup to receive the Meteor LRPT higher resolution pictures?
I have tried receiving from Meteor, but would like to someday. Just moved on to other projects, as always!
Have an error beyond my skill set to resolve. Comments?
pi@raspberrypi:~/wx-ground-station $ sh configure.sh
configuring for /home/pi/wx-ground-station
no crontab for pi
pi@raspberrypi:~/wx-ground-station $ cd aws-s3
pi@raspberrypi:~/wx-ground-station/aws-s3 $ npm install
npm WARN deprecated buffer@4.9.1: This version of ‘buffer’ is out-of-date. You must update to v4.9.2 or newer
npm ERR! Unexpected end of JSON input while parsing near ‘…ps://registry.npmjs.o’
npm ERR! A complete log of this run can be found in:
npm ERR! /home/pi/.npm/_logs/2020-05-08T19_03_10_008Z-debug.log
I’m still working it out. The one problem I haven’t figured out is when I go to my site
http://phfl.s3-website.us-east-1.amazonaws.com/
I get the error at the bottom of the page. I don’t think it is caused by my permissions or credentials, since if I run the index file on my main computer, the exact same error message pops up. In reviewing the index.html file, I don’t see how this is generated.
Mike, another user (“cam”) reported the same issue as you in earlier comments. Read the comments above and look for “Missing credentials in config”. You have the same problem. Double check your configuration steps, especially the setup for the identity pool. That was cam’s problem.
“Step 2: on the Sample Code page, select JavaScript from the Platform list. Save this code somewhere, because we need to add it to the web content later. It looks something like this:”
i cant find this Sample Code page??? where is it? S3? IAM? Cognito?
I am trying to make your project… It will be very usefull to put screenshots!!!
Thanks you again for sharing…. and congrats for your project!
If you follow the instructions in the link I provided, it will walk you through each step of creating the Cognito identity pool. Read this page carefully: https://docs.aws.amazon.com/sdk-for-javascript/v2/developer-guide/getting-started-browser.html#getting-started-browser-create-identity-pool
Hello again! Now i am stuck here….
To deploy your API follow these commands:
cd aws-api
npm install
sls deploy –> command not found??
I don’t know where you are seeing those instructions. They are not in my article.
i saw this form GitHub
https://github.com/alonsovargas3/wx-ground-station
sorry i got confused…. i will follow this page.. i thought it was yours!
https://pinoaa.s3.eu-central-1.amazonaws.com/
AccessDeniedAccess Denied
50712FCA6E066896
MKQ8of0TJ6IzYEJAf6FW5lAq2t/KjU99L1bFlpd/fYEtcMV6/m61oRICJJazSy9qwnO/50d8XuU=
The error log is coming back with the following
originalError:
{ message: ‘Could not load credentials from any providers’,
errno: ‘ETIMEDOUT’,
code: ‘CredentialsError’,
syscall: ‘connect’,
address: ‘169.254.169.254’,
port: 80,
time: 2020-05-24T19:20:10.095Z,
originalError:
{ message:
‘Missing credentials in config, if using AWS_CONFIG_FILE, set AWS_SDK_LOAD_CONFIG=1’,
errno: ‘ETIMEDOUT’,
code: ‘CredentialsError’,
syscall: ‘connect’,
address: ‘169.254.169.254’,
port: 80,
time: 2020-05-24T19:20:10.094Z,
originalError: [Object] } } }
Does it use the file in question and if so where is it!
As stated in the article: “Your credentials file on the Raspberry Pi ~/.aws/credentials”…
sorry are we talking about the files in the first step, as Ive added the line
AWS_SDK_LOAD_CONFIG=1
to both the config and the credentails file.
Also silly question, which directory should these files be in
home/pi/aws or in wx-ground-station.
Thanks
Think Im going to start from scratch as what was working now isnt and I think Ive got my head around this
hello again!
how can i fix the ppm?
rtl_fm -p number?
hi bro, how to change location to malaysia in config file
Enjoyed building this project on my pi4. Just wondering if you had any issues with AWS signaturedoesnotmatch error and if so, how did you resolve it? I believe this is an issue with raspian itself because I can upload the json file using AWS CLI on my mac, but always getting the error on pi. Thanks.
I did not every experience a SignatureDoesNotMatch error. I guess you’ll have to google it and see if there is some way to avoid it.
gm Michael
i beguin your tuto and after install rtl, wxtoimg and gpredict and i attack “amazon step” but i notice one prob (for me) , i have one directory name aws-s3 and not aws but in first step for create credential i see “~/.aws/credentials” and not “~/.aws-s3/credentials” , what should be done ?
your site is wonderful and i hope to run the same asap .Thank info Eric
I don’t know why you have a .aws-s3 directory. Just follow the instructions and create your credentials in .aws or you can add them to the .aws-s3 credentials. Just experiment with it.
Bonjour Michael
check your para “Get the Automation Scripts and Configure” you will see that after sh configure.sh , cd aws3..it does not matter.
on the other hand to install the sdk and node js, which method do you recommend because on aws there are several pages on IOT but nothing very simple for node.js
I found: curl -sL https://deb.nodesource.com/setup_12.x | sudo -E bash –
then sudo apt-get install -y nodejs
is this the right method ?
thank in advance
Eric
sry i see you have a para abt install of node.js which is the answer of my question. Uou had reason, you must take time to read ! my page is on https://s3.eu-west-3.amazonaws.com/notropicdesign.wx/index.html but i have a metadata error like an other reader of your site who found soluce..not me :)
Eric
I’m having issues with predict, I’ve entered my coordinates into the first screen, but on entry, the screen collapses to a single line and no menu screen appears.
The reason for this is due to when you run predict on it’s own it is in new user mode, and unless a tle file is defined for it to “reference” from, it just closes afterwards. If you want to start up predict with the full menu, you need to use predict -t /home/pi/wx-ground-station/weather.tle
How can I set it up to go through my own website and not Amazon
I skipped the aws pieces for now and it took an hour to install a clean raspian and get this all up and running (including installing raspian)!
Once the software was installed, I hooked everything up to a 2 meter vertical and and went off to lunch. When I gpt back. a satellite apparently passed overhead, and I had images waiting for me already!
I will likely diverge a bit and use a local Nginx to serve the images, instead of the aws implementation, since it will be used locally only, and may move to a dedicated antenna eventually, but the basic configuration seems to work just fine!
This was a really nice project – special thanks for the high quality instructions!
–al
WB1BQE
Wow, that is pretty cool! I may do that as well as amazon is just a pain.
As of October 1, MapBox changed their API which causes the ground track maps to not work. If you are experiencing this problem, please get the updated version of the file website/wx-ground-station.js from the GitHub repo for this project: https://github.com/nootropicdesign/wx-ground-station/.
Update this file on your AWS S3 bucket.
Frequence on the RTLSDR has changed how do I fix this
Hi Michael
A nice project from you.
Is using Weewx to record weather data.
Is there a way to integrate Noaa pictures into Weewx.
I have my own server and don’t necessarily want to use AWS.
Upload pictures via FTP?
greetings
André
I implemented this almost a year ago. It’s been working great and I installed the updates in October. I decided to move off of AWS and onto my own web server. So far all has gone well, except the ground track for recent passes is now blank with the track but no map (on my web site). Any suggestions as what might be wrong?
Thanks for a GREAT project that has been fun, both in hardware building (I built the quad antenna) and learning Java scripting.
See my comment above on October 1. Mapbox changed their API, resulting in a need to change the JavaScript. Apply this change https://github.com/nootropicdesign/wx-ground-station/commit/c5336f719024d9f43797a1cf4d0a8e2e2d8f5ec0
This is a great project and very exciting to get your first pictures! Great for teaching that not all satellites just “sit there”. For good/great performance, it’s all about the antenna! I built a Quadrifilar Helix Antenna (see web) and the results were VERY worth the effort!
Thanks for the feedback and great job building a quadrifilar helix antenna! Very impressive.
Thanks Michael – got it running following your instructions (locally running that it). Will add the AWS steps later and build a decent helical antenna for outdoor operation. Another super fun Pi project for sure!
Hi Michael,
I’m having an issue — when I run Predict, it skips the main menu and takes me to the location editing utility. I enter my call sign & position data and at the last entry, the program bombs out to the command prompt without clearing away the last Predict program screen. At the command prompt, characters I type do not appear on the screen. Hitting Enter allows for the typed data to be parsed. I’m forced to reboot to get the Pi to return to normal behavior. Can you offer any guidance on how to sort this?
Thanks,
-Steve
ETA: I’m using Predict v2.2.5
First, thank you for the great instruction. It was hard without much knowledge (like the labrador in front of the computer “I have no idea what i’m doing meme”, but I think I got everything right. I’m experiencing a “image metadata” error like others, but with a different message:
Error getting image metadata: There was an error viewing the directory: Expected uri parameter to have length >= 1, but found “” for params.Bucket
this is my site: http://sq5vco-noaa.wx.s3-website.eu-central-1.amazonaws.com
@Adam SQ5VCO: Where are you seeing that error?
Thanks for the quick reply. I was missing one BUCKET_NAME. Now fixed, but I have another problem. Logs show:
NOAA 18 137.9125 NOAA18-20211011-012146 /home/pi/wx-ground-station/weather.tle $
Found 2 device(s):
0: Realtek, RTL2838UHIDIR, SN: 00000001
1: Realtek, RTL2838UHIDIR, SN: 00000001
Using device 0: Generic RTL2832U OEM
usb_claim_interface error -6
Failed to open rtlsdr device #0.
This rPi is also running an ADS-B receiver (seems the radarbox dongle is just a branded rtl-sdr).
dmesg shows:
3.616329] usb 1-1.3: new high-speed USB device number 4 using dwc_otg
[ 3.758134] usb 1-1.3: New USB device found, idVendor=0bda, idProduct=2838, bcdDevice= 1.00
[ 3.758154] usb 1-1.3: New USB device strings: Mfr=1, Product=2, SerialNumber=3
[ 3.758168] usb 1-1.3: Product: RTL2838UHIDIR
[ 3.758181] usb 1-1.3: Manufacturer: Realtek
[ 3.758194] usb 1-1.3: SerialNumber: 00000001
[ 3.846341] usb 1-1.1.2: new high-speed USB device number 5 using dwc_otg
[ 3.988151] usb 1-1.1.2: New USB device found, idVendor=0bda, idProduct=2838, bcdDevice= 1.00
[ 3.988172] usb 1-1.1.2: New USB device strings: Mfr=1, Product=2, SerialNumber=3
[ 3.988185] usb 1-1.1.2: Product: RTL2838UHIDIR
[ 3.988198] usb 1-1.1.2: Manufacturer: Realtek
[ 3.988211] usb 1-1.1.2: SerialNumber: 00000001
How do I point the NOAA receiver to the other dongle and ADS-B software (dump1090 – in use by Flightaware, FR24, Openskynetwork, ADSBExchange) to the other? Sorry, if that’s too much to ask.
Ok, so I manually stopped dump1080 and other things that might interfere with this and I got it to record a pass. But nothing shown on the website and log shows some errors:
NOAA 15 137.6200 NOAA15-20211011-104736 /home/pi/wx-ground-station/weather.tle 1633942056 938 43 southbound
Found 2 device(s):
0: Realtek, RTL2838UHIDIR, SN: 00000001
1: Realtek, RTL2838UHIDIR, SN: 00000001
Using device 0: Generic RTL2832U OEM
Found Rafael Micro R820T tuner
Tuner gain set to 44.50 dB.
Tuned to 138100000 Hz.
Oversampling input by: 32x.
Oversampling output by: 1x.
Buffer size: 4.27ms
Allocating 15 zero-copy buffers
Sampling at 1920000 S/s.
Output at 60000 Hz.
Signal caught, exiting!
User cancel, exiting…
wxmap: warning: could not find matching pass to build overlay map.
wxtoimg: error: could not open overlay map file ‘/home/pi/wx-ground-station/images/NOAA15-20211011-104736-map.png’
Satellite: NOAA
Status: signal processing……………………….
wxtoimg: warning: Narrow IF bandwidth (purchase upgrade key!), low S/N, or volume too high
Gain: 22.7
Channel A: 3/3B (mid infrared)
Channel B: 1 (visible)
wxtoimg: warning: enhancement ignored: could not find a NOAA/GOES sensor 4 image
wxtoimg: error: could not open overlay map file ‘/home/pi/wx-ground-station/images/NOAA15-20211011-104736-map.png’
Satellite: NOAA
Status: signal processing……………………….
wxtoimg: warning: Narrow IF bandwidth (purchase upgrade key!), low S/N, or volume too high
Gain: 22.7
Channel A: 3/3B (mid infrared)
Channel B: 1 (visible)
wxtoimg: warning: enhancement ignored: need sensor 4 image for NO enhancement
wxtoimg: error: could not open overlay map file ‘/home/pi/wx-ground-station/images/NOAA15-20211011-104736-map.png’
Satellite: NOAA
Status: signal processing……………………….
wxtoimg: warning: Narrow IF bandwidth (purchase upgrade key!), low S/N, or volume too high
Gain: 22.7
Channel A: 3/3B (mid infrared)
Channel B: 1 (visible)
wxtoimg: warning: enhancement ignored: could not find a NOAA sensor 4 image
wxtoimg: error: could not open overlay map file ‘/home/pi/wx-ground-station/images/NOAA15-20211011-104736-map.png’
Satellite: NOAA
Status: signal processing……………………….
wxtoimg: warning: Narrow IF bandwidth (purchase upgrade key!), low S/N, or volume too high
Gain: 22.7
Channel A: 3/3B (mid infrared)
Channel B: 1 (visible)
wxtoimg: warning: enhancement ignored: could not find sensor 4 image
node /home/pi/wx-ground-station/aws-s3/upload-wx-images.js “NOAA 15” 137.6200 /home/pi/wx-ground-station/images/NOAA15-20211011-104736 43 southbound 938 “1 25338U 98030A 21283.57492406 .00000053 00000-0 40662-4 0 9994” “2 25338 98.67$
/home/pi/wx-ground-station/receive_and_process_satellite.sh: line 48: node: command not found
It might be the case, that it’s trying to decode using the other dongle with the ADS-B antenna, will disconnect it and see. I’m not sure, why this error occurs “wxmap: warning: could not find matching pass to build overlay map”. I’m pretty sure I have my coordinates ok in the many places.
Ok, so I re-checked the coordinates (I’m in the eastern hemisphere, so I missed the negative deg in Predict). Updated node.js to v16 (somehow it was stuck on v14). Removed the other dongle, stopped the ads-b processes, re-generated flyby schedules and 3 latest logs show capture, but no decoding commences:
NOAA 19 137.1000 NOAA19-20211011-192651 /home/pi/wx-ground-station/weather.tle 1633973211 987 49 northbound
Found 1 device(s):
0: Realtek, RTL2838UHIDIR, SN: 00000001
Using device 0: Generic RTL2832U OEM
Found Rafael Micro R820T tuner
Tuner gain set to 44.50 dB.
Tuned to 137580000 Hz.
Oversampling input by: 32x.
Oversampling output by: 1x.
Buffer size: 4.27ms
Allocating 15 zero-copy buffers
Sampling at 1920000 S/s.
Output at 60000 Hz.
Signal caught, exiting!
User cancel, exiting…
Ok, so I was able to get it to try to decode. Getting only static and faint beeping on passes in the wavs and only static with country borders in the image. Log says:
wxtoimg: warning: Narrow IF bandwidth (purchase upgrade key!), low S/N, or volume too high
Gain: 144.8
What is this thing with the upgrade key? The antenna is working, I even got it do decode ADS-B of a close by airplane on the v-dipole before I killed the ads-b services, to make WX sat reception possible.
Wavs and images are on the rPi, but not in AWS S3. Log says after decoding:
/home/pi/wx-ground-station/receive_and_process_satellite.sh: line 48: node: command not found
Sounds like you are receiving a weak signal, perhaps because the satellite pass was not close enough. The “upgrade key” message is just a false clue, ignore it. The image received from the satellite does not contain the map borders — that is added by the wxtoimg software. You are not receiving that from a satellite.
node: command not foundThis means you did not install Node.js on your RPi. That was one of the instructions. The tooling is all based on Node.js.
I know the borders are generated. When I run:
node -v
It returns v16 (was v14 before I installed, so there was node in my pi before, so I guess I have it installed?
On few passes I got same results. I live in a rural area, so no QRM, the antenna is bandpads filtered with an FM Notch. No LNA. VNA szows resiannce albd low SWR. I don’t know what the problem might be.
ok, so I did sudo apr-get update and then upgrade and somehow this go things working. The uploads are on the site:
http://sq5vco-noaa.wx.s3-website.eu-central-1.amazonaws.com
but no decoding taking place. I’ll re-check the antenna. Are there any settings that might be off here? The predictions match the actual flybys (so it’s not that coordinates do not match or somethins).
Antenna re-checked, SWR 1.11, removed the filters, so it goes straight to the silver RTL-SDR dongle. In the captured WAVs I can hear the beeping, but a lot of noise (and I don’t have any QRM over here). My friends suggest that I might have the bandwidth or gain wrong, but how do I adjust in this project?
So finally I got to the bottom of it. The problem was not software or the antenna, but the fact that PoE splitter 5V converter up on the mast, powering the rPi was generating QRM, blanking the transmissions. I’m looking for a better powering solution vial linear PS and a voltage regulator (injected via ethernet cable too, since I already have it up there). These results are with my home X510, which is not the best, but workable for NOAA. Up on the mast, I’ll have the v-dipole and maybe a QFH later on.
http://sq5vco-noaa.wx.s3-website.eu-central-1.amazonaws.com
I have to admit defeat. This is my first attempt with AWS.
I had the raspberrynoaa image working perfectly but wanted to get the images on m website, or at least online somewhere. I hoped this would fix it but alas, 5 attempts later, 3 complete new reinstalls and I still cannot get the thing to work.
whenever I run the ./schedule_all.sh it calculates the passes but then completely refuses to accept any was access key I throw at it anywhere. The instructions above do have a few holes that require some knowledge is linux programming. The first thing was that there is no .aws folder created, and no-where above does it tell you that you need to create it yourself. I re-ran installations several times to get it to appear, until I eventually had to create the folder and the two files in it.
Getting through it all now and going through every single step above line by line it still gives this warning..
InvalidAccessKeyId: The AWS Access Key Id you provided does not exist in our records.
I think I need to admit defeat on this part of the project before I throw the pi and associated cables out of the window.
Sorry you are having trouble. My article gives lots of detailed instructions, but in the case of AWS instructions, I link to AWS articles for the details that you need to follow.
In my article section “AWS SDK Credentials”, I provided two links to AWS articles which provide the instructions you need: one to show you how to create and get AWS credentials (“Getting your credentials”), and the second (“Loading Credentials in Node.js from the Shared Credentials File”). The second article tells you to store your credentials in the file .aws/credentials. So yes, you need to create the .aws directory, and some familiarity with Linux is assumed since this is a Raspberry Pi project.
Is it possible to receive the METEOR satellite images with this setup?
I am successfully receiving and processing images from NOAA 15, 18 and 19 using this set up.
No, I don’t know how to receive GOES…
Here is my AWS website.
http://kcairvin11.wx.s3-website-us-west-2.amazonaws.com/
Hello, I followed your tutorial successfully and am able to receive images from NOAA satellites. However, it looks like all I am receiving is a map of the U.S. with no overlaying clouds, precipitation, etc. I checked your AWS website, and the recent captures all are similar to mine, with some static and state border lines, but no precipitation data. Is this an error on my end? Or is this all the information that the satellites are currently transmitting? Thank you.
You are correct that my site is not receiving any data at the moment. I think my RTL-SDR is not working. I have not been able to figure out the problem. If you have similar images, it means you are not receiving any data. Keep in mind that the map not received from the satellite and is generated by the software on your RPi. Make sure your system time and timezone are set correctly and check the predicted passes against https://www.n2yo.com/ to make sure your schedule is correct.
I finally solved my reception problem — it was a bad antenna the whole time. It must have gotten corroded and formed a bad connection. Everything is back up and running on my site.
Thank you! This was an amazing write up. The level of detail and the work you clearly continue to put into it are very impressive. After 2 weeks of trial and error I just today got my own version of it running on-line. It was extremely challenging, but also very rewarding; and completely impossible without your help. Thank you so much for putting this together.
my implementation of your tutorial:
https://s3.us-west-2.amazonaws.com/0xbadcoffee.wx/index.html
Great job, looks great! I like to think of my projects as advanced level that sorts out the real engineers from the wannabes! You have to want it bad enough to succeed.
Great thoughts! But if you ever need a good transcriber I want to share with you a video to text transcriber. You can use the MP4 to text the transcript and transform it into a blog post. https://audext.com/video-to-text/
What’s with the dependency on amazon? Why not simply install lighthttp and serve it right off the pi3? you’d access it on a url in your internal network.
The use of AWS is just to give a way to publish the site publicly on cheap infrastructure. Yes, you can definitely install a local webserver on the RPi for your local viewing without the AWS complexity.
I’ve had this working great for a number of years but about a week ago it quit reporting. In trouble shooting I execute ./schedule_all.sh and get the following error. Any help would be appreciated.
pi@raspberrypilcd:~/wx-ground-station $ ./schedule_all.sh
date: invalid date ‘TZ=”UTC” @’
/home/pi/wx-ground-station/schedule_satellite.sh: line 23: [: ==: unary operator expected
/home/pi/wx-ground-station/schedule_satellite.sh: line 23: [: ==: unary operator expected
date: invalid date ‘TZ=”UTC” @’
/home/pi/wx-ground-station/schedule_satellite.sh: line 23: [: ==: unary operator expected
/home/pi/wx-ground-station/schedule_satellite.sh: line 23: [: ==: unary operator expected
date: invalid date ‘TZ=”UTC” @’
/home/pi/wx-ground-station/schedule_satellite.sh: line 23: [: ==: unary operator expected
/home/pi/wx-ground-station/schedule_satellite.sh: line 23: [: ==: unary operator expected
internal/fs/utils.js:332
throw err;
^
Error: ENOENT: no such file or directory, open ‘/home/pi/wx-ground-station/upcoming_passes.txt’
at Object.openSync (fs.js:498:3)
at Object.readFileSync (fs.js:394:35)
at uploadUpcomingPasses (/home/pi/wx-ground-station/aws-s3/upload-upcoming-passes.js:17:18)
at Object. (/home/pi/wx-ground-station/aws-s3/upload-upcoming-passes.js:13:1)
at Module._compile (internal/modules/cjs/loader.js:1085:14)
at Object.Module._extensions..js (internal/modules/cjs/loader.js:1114:10)
at Module.load (internal/modules/cjs/loader.js:950:32)
at Function.Module._load (internal/modules/cjs/loader.js:790:12)
at Function.executeUserEntryPoint [as runMain] (internal/modules/run_main.js:75:12)
at internal/main/run_main_module.js:17:47 {
errno: -2,
syscall: ‘open’,
code: ‘ENOENT’,
path: ‘/home/pi/wx-ground-station/upcoming_passes.txt’
}
I guess you didn’t hear that the NOAA satellites are no longer operating. See the announcement at the beginning of the article above.
Thanks, I missed your notice :-)
Any suggestions on what else I can do with my setup?
Meteor sat?