In part 1 of this series I showed how to set up a simple LoRaWAN gateway, and in a previous article described a simple but powerful LoRaWAN-capable end device that I designed. Now I’ll show how these devices can be used in a real LoRaWAN application.
LoRaWAN Application on The Things Network
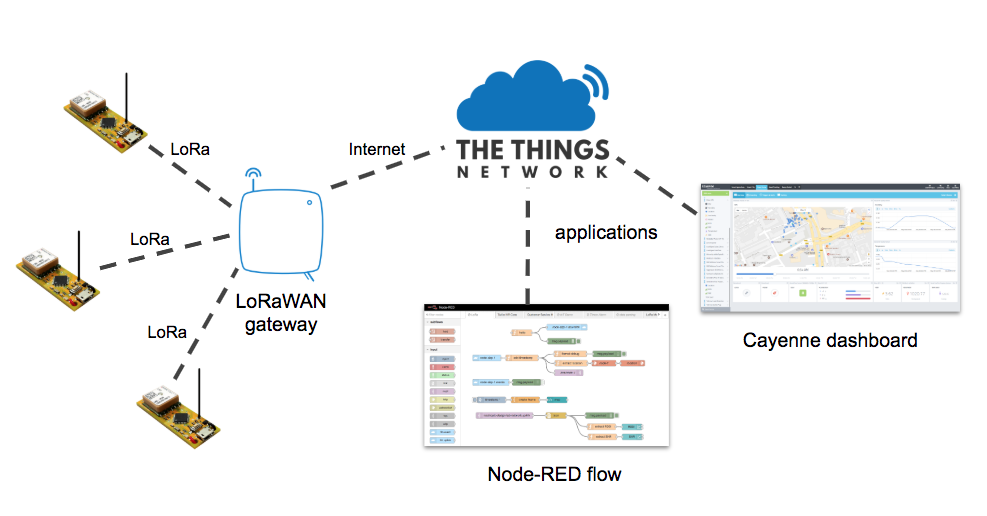
The Things Network (TTN) is the Internet infrastructure that allows us to use end devices to do something useful on the Internet. End devices (sometimes called nodes) talk to a nearby gateway, which is connected to the Things Network infrastructure. An application is anything you can imagine on the Internet that does something with the data provided by the end devices. The Things Network bridges the radio technology to Internet technology. The communication does not need to be one-way; applications can downlink data to end devices, too. A common example of an application is a Cayenne dashboard which is an easy way to visualize data from your devices. You can also read data from TTN using Node-RED, a common tool for building IoT solutions.
In part 1 I showed how a gateway is registered to TTN. To connect end device nodes, we also have to define an application in TTN, even if the real functionality of our application is implemented elsewhere on the Internet. An application has a name and a unique ID called an Application EUI. It also creates an Application Access Key that you use to integrate other services like Cayenne or Node-RED to your application. I won’t go into the integration details because there is plenty of info available about that.
After creating a TTN application, you need to add devices to the application so that your code on the devices can talk to TTN. There are 2 ways for a device to authenticate with TTN. The recommended and more secure way is called over-the-air-activation, or OTAA. This is the default mechanism when you create a device in TTN. With OTAA, a device negotiates with the network to establish a network session key and an application session key. The other mechanism is activation-by-personalization, or ABP. With ABP, the keys needed to communicate with the network are hard-coded in the device ahead of time. This makes it much easier and quick to connect, but is less secure.
Before we go any further with details about OTAA and ABP, let’s define the many types of IDs and keys associated with LoRaWAN applications and devices. It can be very confusing, because some of them have very similar names!
Gateway ID: A unique identifier for your gateway. You specify this when you register a gateway with TTN.
Application EUI: A unique identifier for an application. It is provided by TTN when you create an application.
Device ID: A name that you assign to a device when you register it in TTN.
Device EUI: A unique identifier for an end device. This may be provided by your hardware so that you can specify it when registering a device in TTN. OR, you can have TTN generate one for you.
Device Address: An identifier for an end device that is used during communication between device and TTN. This is assigned dynamically when using OTAA, but is hard-coded when using ABP.
Application Key: A value that is used for secure communication between device and TTN. This is generated when a device is registered with a TTN application. Each device has a different Application Key.
Network Session Key: A value that is used for secure communication between device and TTN. This is assigned dynamically for a session when using OTAA, but is hard-coded when using ABP.
Application Session Key: A value that is used for secure communication between device and TTN. This is assigned dynamically for a session when using OTAA, but is hard-coded when using ABP.
Is everything clear now? I didn’t think so. Let’s break it down in terms of what information you need for the two approaches, OTAA and ABP.
Over-the-Air Activation (OTAA)
After defining an application in TTN and registering a device, the device code needs some of important information in order to connect to the network successfully via a gateway. OTAA requires 3 pieces of information: Application EUI, Device EUI, and Application Key. The other information — Device Address, Network Session Key, and Application Session Key — will be determined dynamically during the activation process.
See the OTAA example on GitHub. Note the library dependencies required for the examples to work.
Although this method is secure and recommended, connecting to the network can take several minutes or more. The negotiation of session keys requires that the network communicate back down to to the end device during precisely timed receive windows, which can be tricky.
Activation-by-Personalization (ABP)
Using the ABP approach, the device code needs different information in order to connect to the network. ABP requires 3 pieces of information: Device Address, Network Session Key, and Application Session Key. This method of connecting is much faster and reliable, but for a number of reasons is less secure.
See the ABP example on GitHub. Note the library dependencies required for the examples to work.
When using an ABP device, it’s important to disable the frame counter checks in the device settings on TTN. This is one of the things making it less secure.

Range Testing
By driving around with an end device node in my car, I’ve tried to determine my communication range with my gateway. I’ve been a bit disappointed, but there are many things that affect signal propagation. First, despite having an 10-foot antenna mast, my antenna is still not even close to being higher than my house. And I’m hardly an RF engineer when it comes to designing my custom end devices.
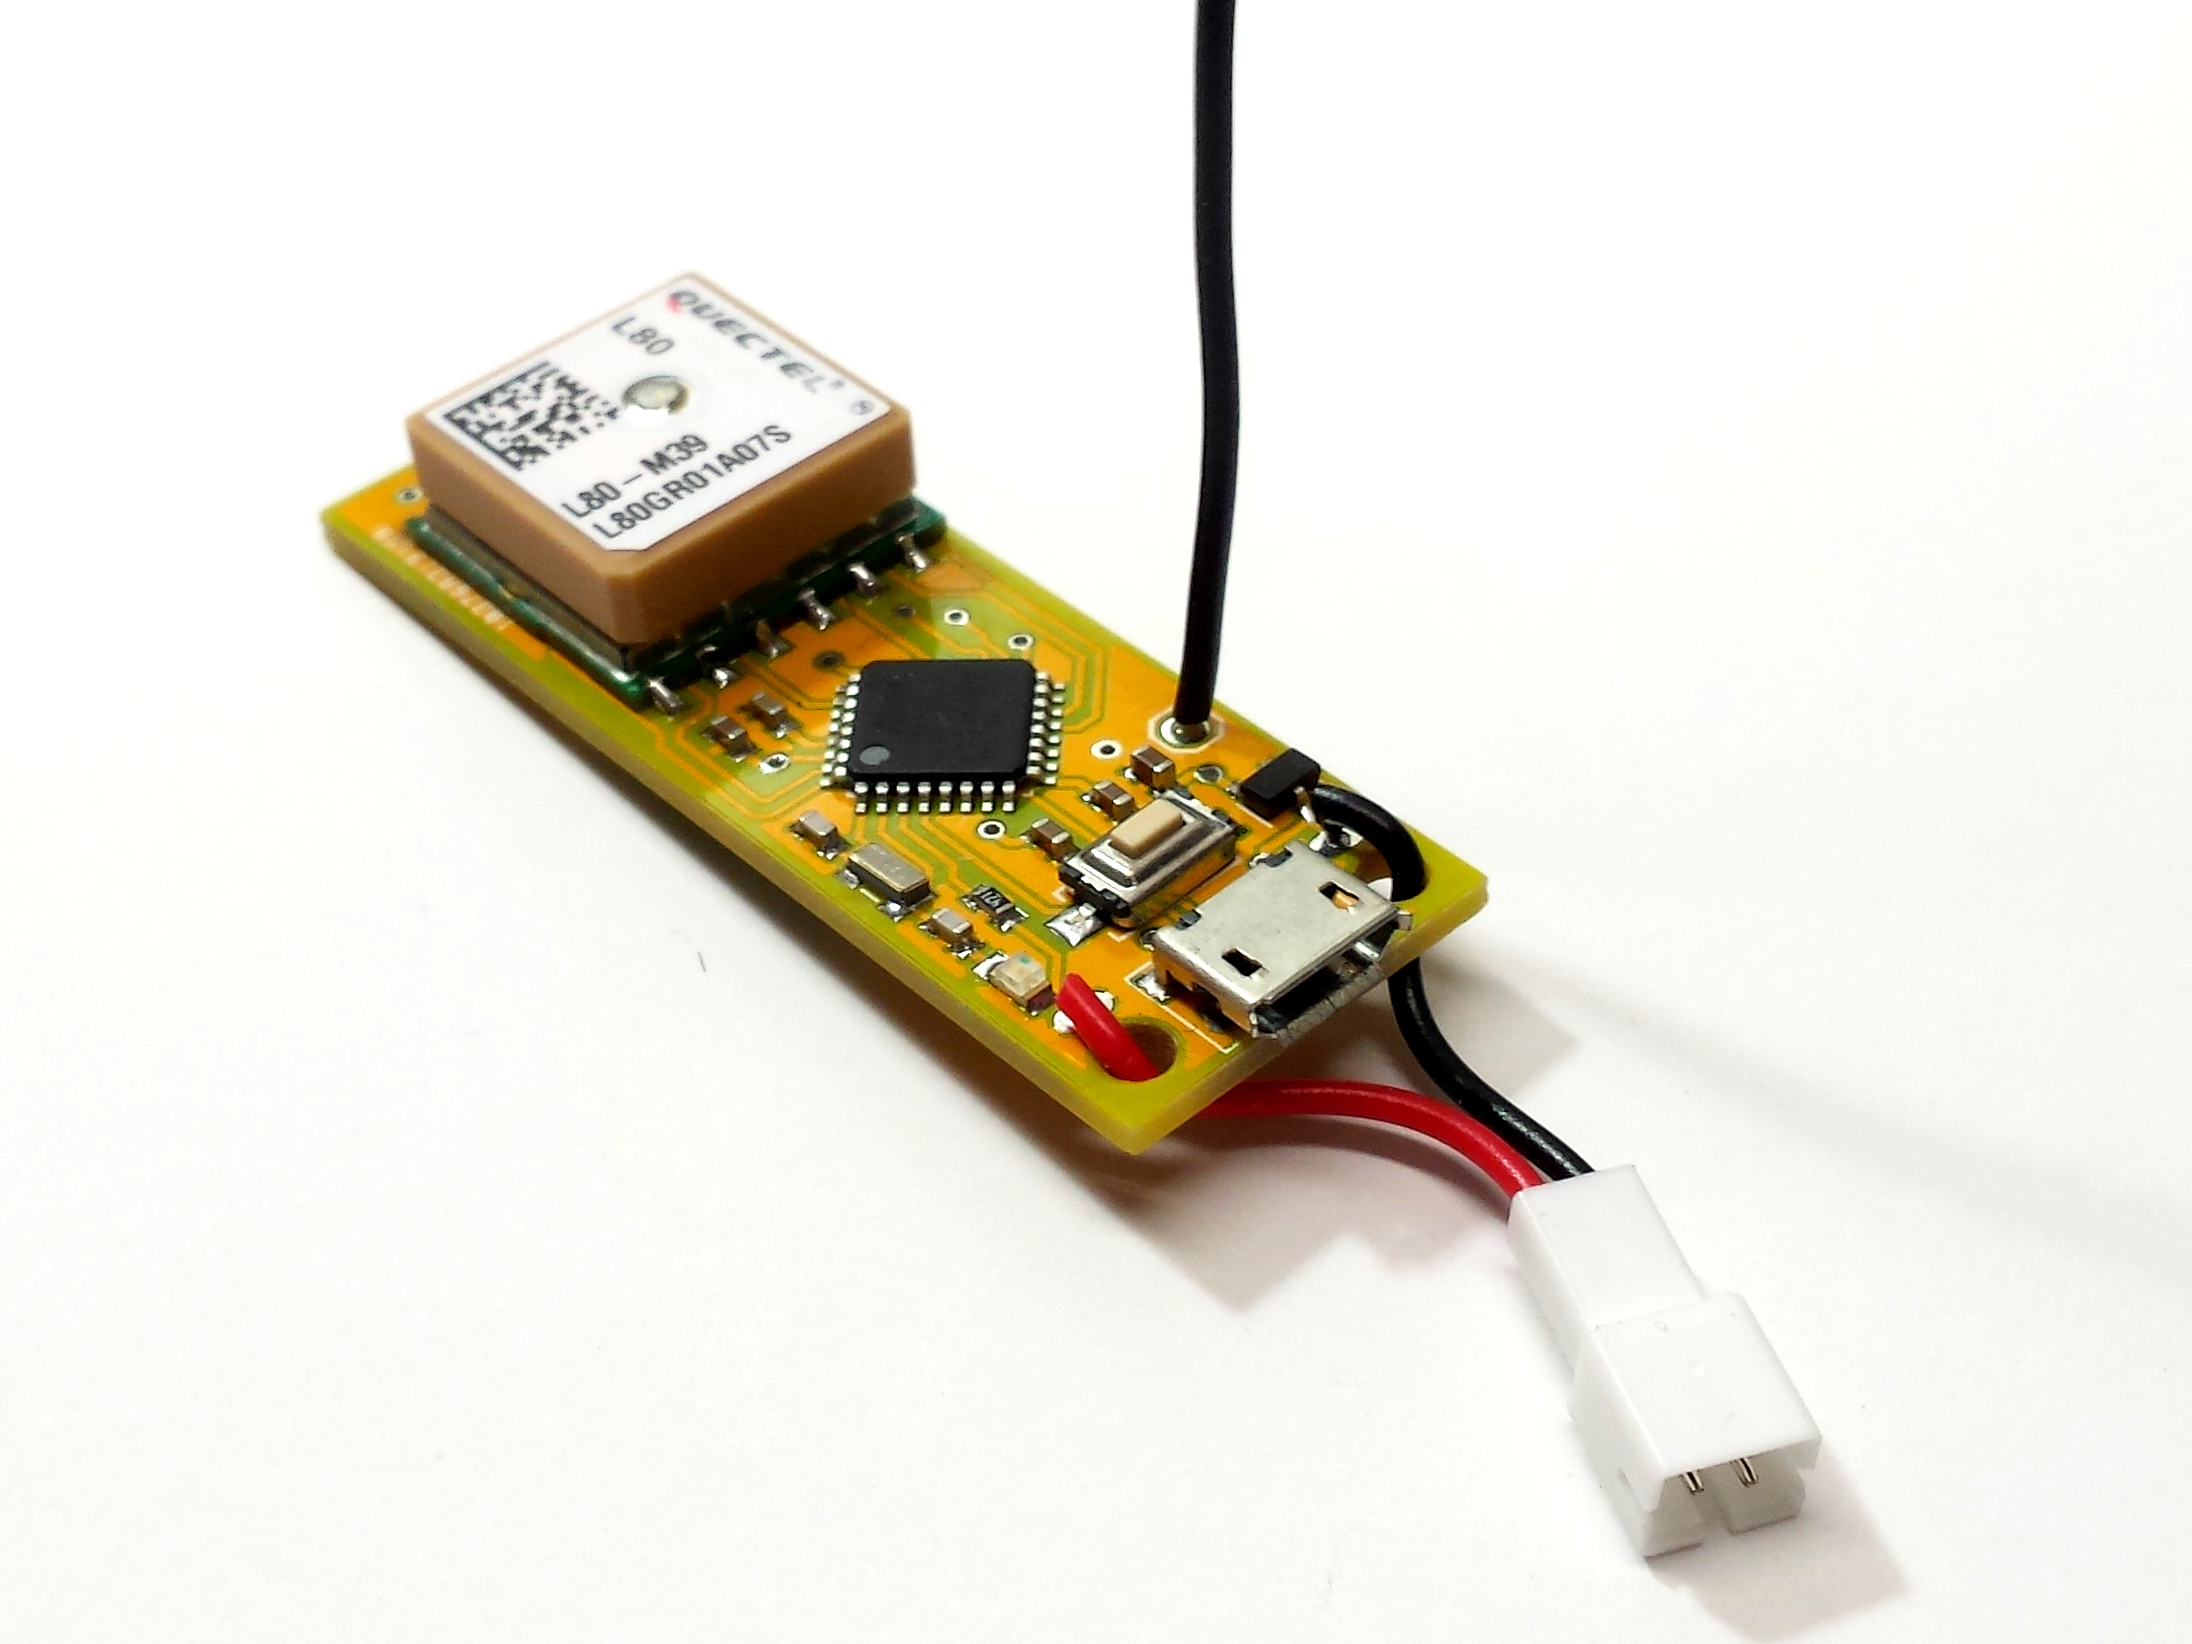
They have a simple wire antenna, but my prior experimentation led me to think that this was just as good as any other LoRa antenna I’ve tried. In one test, my son and I each strapped a LiPo battery powered end device to our bikes and went for a long ride, having each node send GPS data every minute to my gateway (I realize that this test used far more duty cycle than one should in a real application). A Cayenne dashboard mapped the received data from each device. The smooth path on the map is the actual path as measured by GPS in my son’s phone. Superimposed on this are two non-smooth paths defined by blue points at which the gateway “heard” the GPS data reported from the end-device. The gateway is in the southwest are of the map, and you can clearly see that it did not receive much data when we are on the northernmost part of our bike ride. The maximum distance for a received signal was about 1.2 miles.

I also experimented between using confirmed vs. unconfirmed messages. Confirmed message get an acknowledgement from the gateway, whereas unconfirmed are more like “fire and forget”. Counterintuitively, it seemed like confirmed messages were more reliable and had better range. Nonetheless, I will continue to do more range testing to try to improve the situation.
Node-RED Integration
An online service like Cayenne makes it super easy to integrate with TTN, but you can also integrate with your own software via MQTT. Data uplinked from your devices to your TTN application are published to MQTT topics that you can connect to in your own application. I love using Node-RED for all sorts of IoT fun. You can use MQTT nodes (here “nodes” refers to Node-RED components, not end devices) to receive the data published by TTN. To make it even easier, TTN has even written custom nodes for TTN integration. If you are a Node-RED junkie like me, I strongly recommend you look into this type of integration so that you can build just about anything based on data from LoRaWAN end devices.

I hope you found these posts about LoRaWAN useful. The learning curve is significant but it’s exciting when a technology is so new.

Hi.
i liked your post, and you built a good project. congrats…
but i would like you to help me.. i am trying to know if is possible to connect to a public gateway in my country.
Hello,
nice post. Can You share the NodeRed configuration?
Node-RED config:
[{"id":"9d3ad6de.554dd8","type":"ttn uplink","z":"f7543093.87732","name":"node-abp-1","app":"762b9e0c.b3823","dev_id":"lora-gps-node-abp-1","field":"","x":136,"y":187,"wires":[["75a83b46.aa4f74"]]},{"id":"5f745b65.a70674","type":"debug","z":"f7543093.87732","name":"","active":true,"console":"false","complete":"false","x":727,"y":167,"wires":[]},{"id":"a0cbbcc5.69d4d","type":"ttn event","z":"f7543093.87732","name":"node-abp-1 events","app":"762b9e0c.b3823","dev_id":"lora-gps-node-abp-1","event":"#","x":156,"y":307,"wires":[["766c1714.30b268"]]},{"id":"766c1714.30b268","type":"debug","z":"f7543093.87732","name":"","active":false,"console":"false","complete":"false","x":331,"y":307,"wires":[]},{"id":"75a83b46.aa4f74","type":"function","z":"f7543093.87732","name":"add timestamp","func":"msg.payload.time = (new Date()).toLocaleString();\nreturn msg;","outputs":1,"noerr":0,"x":309,"y":187,"wires":[["770fb4ea.2022cc","17430081.b67fcf","7cd5033c.67c6dc"]]},{"id":"770fb4ea.2022cc","type":"mqtt out","z":"f7543093.87732","name":"lora/node-1","topic":"lora/node-1","qos":"","retain":"true","broker":"be97e5d.23c7618","x":539,"y":260,"wires":[]},{"id":"43bee282.ef19dc","type":"mqtt in","z":"f7543093.87732","name":"nootropic-design-lab-network uplink","topic":"nootropic-design-lab-network/devices/+/up","qos":"0","broker":"4a035a73.8c5364","x":207,"y":382,"wires":[["c019eec6.bb469"]]},{"id":"e09aeda8.76a82","type":"debug","z":"f7543093.87732","name":"","active":true,"console":"false","complete":"false","x":675,"y":382,"wires":[]},{"id":"c019eec6.bb469","type":"json","z":"f7543093.87732","name":"","pretty":false,"x":461,"y":382,"wires":[["e09aeda8.76a82","be940e5e.698d4","c641aff4.c4c0f"]]},{"id":"5199b8e2.e3be38","type":"ui_chart","z":"f7543093.87732","name":"RSSI","group":"757f9ae2.5d7894","order":0,"width":"0","height":"0","label":"RSSI","chartType":"line","legend":"false","xformat":"HH:mm","interpolate":"linear","nodata":"waiting","dot":true,"ymin":"-120","ymax":"-30","removeOlder":"4","removeOlderPoints":"","removeOlderUnit":"3600","cutout":0,"useOneColor":false,"colors":["#ff8d00","#aec7e8","#ff7c0a","#2ca02c","#98df8a","#d62728","#ff9896","#9467bd","#c5b0d5"],"useOldStyle":false,"x":834,"y":438,"wires":[[],[]]},{"id":"be940e5e.698d4","type":"function","z":"f7543093.87732","name":"extract RSSI","func":"msg.payload = msg.payload.metadata.gateways[0].rssi;\nreturn msg;","outputs":1,"noerr":0,"x":684,"y":437,"wires":[["5199b8e2.e3be38"]]},{"id":"82903edb.b96f5","type":"ui_chart","z":"f7543093.87732","name":"SNR","group":"757f9ae2.5d7894","order":0,"width":"0","height":"0","label":"SNR","chartType":"line","legend":"false","xformat":"HH:mm","interpolate":"linear","nodata":"waiting","dot":true,"ymin":"-20","ymax":"10","removeOlder":"4","removeOlderPoints":"","removeOlderUnit":"3600","cutout":0,"useOneColor":false,"colors":["#1f77b4","#aec7e8","#ff7f0e","#2ca02c","#98df8a","#d62728","#ff9896","#9467bd","#c5b0d5"],"useOldStyle":false,"x":835.5,"y":487,"wires":[[],[]]},{"id":"c641aff4.c4c0f","type":"function","z":"f7543093.87732","name":"extract SNR","func":"msg.payload = msg.payload.metadata.gateways[0].snr;\nreturn msg;","outputs":1,"noerr":0,"x":688.5,"y":487,"wires":[["82903edb.b96f5"]]},{"id":"916465ab.da4948","type":"worldmap","z":"f7543093.87732","name":"location","lat":"45.0465","lon":"-93.4744","zoom":"17","layer":"OSM","cluster":"","maxage":"","usermenu":"show","layers":"show","panit":"true","x":853,"y":213,"wires":[]},{"id":"17430081.b67fcf","type":"function","z":"f7543093.87732","name":"extract location","func":"var gps = msg.payload.gps_1;\nif (gps) {\n var m = {};\n m.name = 'node-1';\n m.lat = gps.latitude;\n m.lon = gps.longitude;\n msg.payload = m;\n return msg;\n}","outputs":1,"noerr":0,"x":551,"y":213,"wires":[["f6643ee0.8fcd7"]]},{"id":"f6643ee0.8fcd7","type":"worldmap-tracks","z":"f7543093.87732","depth":"50","name":"node-1","x":712,"y":213,"wires":[["916465ab.da4948"]]},{"id":"7cd5033c.67c6dc","type":"function","z":"f7543093.87732","name":"format debug","func":"if (msg.payload.gps_1) {\n msg.payload.gps_1.time = msg.payload.time;\n msg.payload = msg.payload.gps_1;\n} else {\n msg.payload = msg.payload.time;\n}\nreturn msg;","outputs":1,"noerr":0,"x":547,"y":167,"wires":[["5f745b65.a70674"]]},{"id":"762b9e0c.b3823","type":"ttn app","z":"","appId":"nootropic-design-lab-network","accessKey":"","discovery":"discovery.thethingsnetwork.org:1900"},{"id":"be97e5d.23c7618","type":"mqtt-broker","z":"","broker":"nootropicdesign.com","port":"8883","tls":"67cad65a.96bda8","clientid":"","usetls":true,"compatmode":true,"keepalive":"60","cleansession":true,"willTopic":"","willQos":"0","willPayload":"","birthTopic":"","birthQos":"0","birthPayload":""},{"id":"4a035a73.8c5364","type":"mqtt-broker","z":"","broker":"us-west.thethings.network","port":"1883","clientid":"","usetls":false,"compatmode":true,"keepalive":"60","cleansession":true,"willTopic":"","willQos":"0","willPayload":"","birthTopic":"","birthQos":"0","birthPayload":""},{"id":"757f9ae2.5d7894","type":"ui_group","z":"","name":"Signal Strength","tab":"11db8351.c9b2ad","disp":true,"width":"10"},{"id":"67cad65a.96bda8","type":"tls-config","z":"","name":"","cert":"","key":"","ca":"","certname":"","keyname":"","caname":"","verifyservercert":false},{"id":"11db8351.c9b2ad","type":"ui_tab","z":"","name":"LoRa","icon":"dashboard","order":1}]