Store › Forums › Lumazoid › General Discussion › Arduino -Lumazoid – standalone mic based
Tagged: lumazoid, mems, microphone, standalone
- This topic has 5 replies, 3 voices, and was last updated 7 years, 8 months ago by
Azzamat.
-
AuthorPosts
-
May 17, 2018 at 1:01 pm #9649
philsaudio
ParticipantThanks for putting the source up on github.
I have managed to load the code onto an Arduino Uno and get it to work. I have one of your production boards and I had to jump the audio from your Lumazoid to my Arduino Uno until I figure out how to put a small cap or MEMS mic and compressor on the Uno to support a stand alone Lumazoid.
I am new to all this having grown up with a Kim I board, I about fainted when I discovered Atmel Studio 7. I have been learning how to follow the .h files around and have attempted to change one of the [number of LED] to 144 to no avail. It is amazing how one small change in one line can create errors all over the system. I know I can figure this out but I mention it because you said it was easy to another guy on another thread and that makes me smile. I guess it depends on who the other guy is.
May 17, 2018 at 2:17 pm #9650ParticipantI guess what I discovered jumping the audio from the production board to my Auduino Uno with the Lumazoid code running is; the 328P wants to see a very hot signal, 5vPP, almost if not very much clipping.
-
This reply was modified 8 years, 2 months ago by
philsaudio.
June 27, 2018 at 12:02 pm #9714ParticipantHere is what my first “AcousticDuinoZoid” prototype looks like. I will give more details on construction and design decisions but first a look. I mounted the Mic, Mic preamp/leveler, buttons and a pot to the shield. On this one the strip is powered from the Arduino 5v Regulator so the JST connector is soldered to the shield.
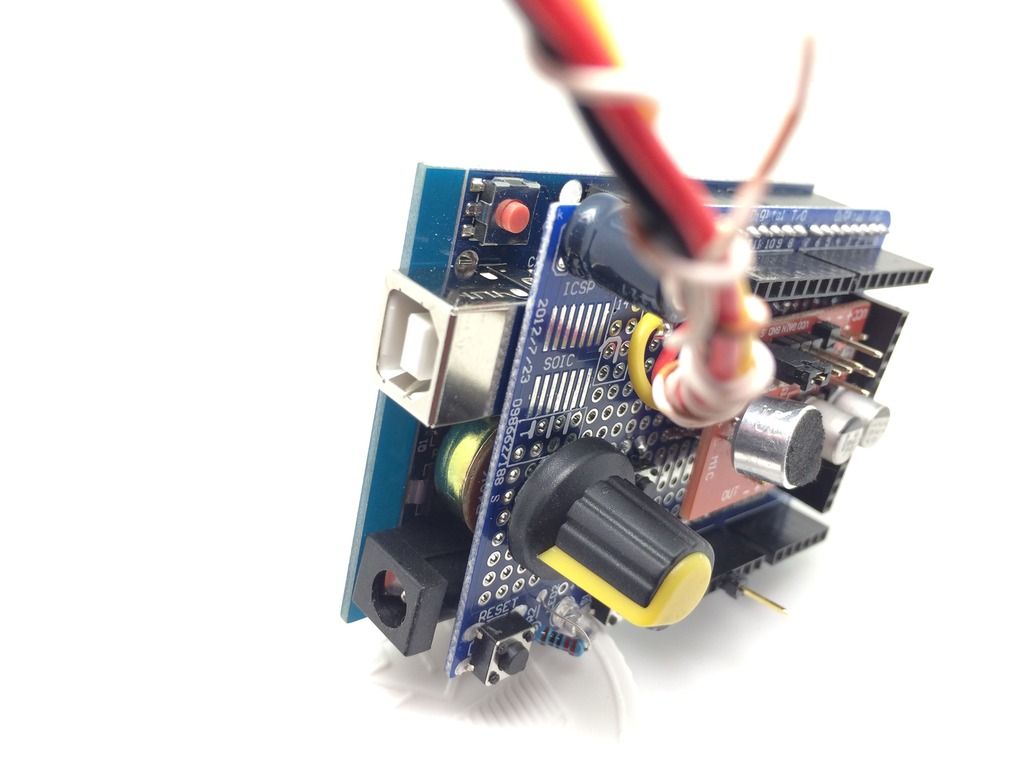
This is the PhilDuinoZoid shield top side.

This is the PhilduinoZoid (prototype 1) shield bottom side.

-
This reply was modified 8 years, 1 month ago by
-
This reply was modified 8 years, 1 month ago by
-
This reply was modified 8 years ago by
Michael. Reason: fixed image links
June 27, 2018 at 1:39 pm #9717ParticipantYou know, it is so hard for ME to use this forum, and putting images up is so difficult, and the inability to come back and edit after a couple of minutes, I give up on sharing this project. It would have been good.
Thanks for the code Michael, I could not do that in a hundred years. Without being able to post pictures I can not tell my story.
The above link is to my youtube of the prototypes.
-
This reply was modified 8 years, 1 month ago by
-
This reply was modified 8 years, 1 month ago by
June 29, 2018 at 10:25 am #9722Michael
KeymasterThanks for sharing Phil — I fixed the image links in your post. Photobucket makes it very hard for you to get to the actual image URL, and that’s why it is tricky to post your photos. It’s easy if you just have a URL to a .jpg, but Photobucket makes it hard.
November 3, 2018 at 1:40 pm #9971Azzamat
Participantawesome looking project Phil. make sure to do another video when you’ve unrolled all those other leds
-
This reply was modified 8 years, 2 months ago by
-
AuthorPosts
- You must be logged in to reply to this topic.